Band Zero Front Raise
How to Do the Band Zero Front Raise | In-Depth Guide [VISUAL LEARNERS]
Proper Form & Common Mistakes | Home Resistance Training
WHAT DO YOU WANT TO SEE?
QUICK DEMO
QUICK DEMO
MUSCLES THIS WORKS
MUSCLES
MAIN MUSCLES WORKED IN the Band Zero Front Delt Raise
ANTERIOR DELTOID
OTHER MUSCLES WORKED:
- Pectoralis major
- Coracobrachialis
- Biceps brachii
- Rotator cuff (infraspinatus, supraspinatus, subscapularis, teres minor)
- Rhomboids
- Mid and lower trapezius
- Latissimus dorsi
STARTING POINTERS
Starting Pointers
WHAT WE'RE DOING TODAY
ALL WE'RE DOING:
We're drawing a narrow zero with our fists outstretched in front of us.
This front raise variation adds movement of your arm slightly out to the side and back in again - “drawing” a narrow zero shape. Adding movement in another direction, not just up and down, will work more muscles and reinforce good movement patterns. In this case, your rotator cuff muscles and the muscles of your shoulder blade will be working together to adjust their position as your arm changes directions.
The movement is done from the same starting position as standard front raises. Instead of just lifting and lowering your arm down, with the Zero Front Raise your arms move in a narrow oval shape - like a narrow zero. This shape takes your arms out to and in from the side as it lifts up and down. This version of the exercise uses a band for resistance. The resistance will increase as your arms lift up, your deltoid muscles will work hardest at the top of the movement.
HOW TO DO THE EXERCISE
LOOKS
HOW Band Zero Front Delt Raises SHAPE OUR BODY
Firm and toned shoulders, forms the bulk of the shoulder muscle (along with the lateral and posterior deltoid).
PROPER FORM
PROPER FORM: Band Zero Front Raise
EQUIPMENT, SETS & REPS
EQUIPMENT
Main set (3: Light/Med/Heavy)
X-Heavy Band (I recommend getting this too if you plan to use resistance bands frequently).
SUGGESTED STARTING WEIGHT FOR WOMEN:
Moderate resistance bands
SETS & REPS:
4-5 Zeros in each direction
PACE:
Controlled movement - Can be quicker on the up movements and slower down, keeping the shape of the movement.
BODY POSITION
BODY POSITION FOR THE Band Zero Front Raise
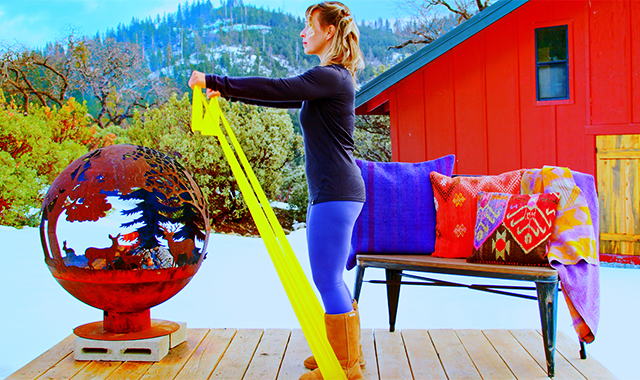
BAND: Secure the band by standing on it with both feet. One end of the band held in each hand.
FEET: Feet shoulder width apart, toes pointed forward.
BODY STANCE: Neutral spine (includes neck), knees slightly bent, sternum lifted, shoulder blades in and down your back, space between the top of your shoulders and earlobe.
ARMS: In front of your hips with your elbows straight but not locked - can have a slight bend as this can be more comfortable - less strain on your elbow joint, but do not move through your elbow. If possible try to have some tension on the band throughout the movement but be able to complete the lift to shoulder level.
HANDS/GRIP: Pronated forearm grip, palm facing front of thighs. This should be comfortable, it is fine if you prefer a neutral grip position (palms facing in). Hold one end of the band in each hand. The band should enter your hand on the thumb side of your hand and cross the palm to the little finger side. The band will be pulling your arm into internal rotation and your external rotators will be working to hold your upper arm in position.
HOW TO DO
HOW TO DO Band Zero Front Raises
CUE: Focus on the shape you are “drawing” with the weights to get the maximum benefit of the exercise.
Lift your arms up in a narrow oval pattern - as they lift up, they move in slightly - as your hands move in they move closer together about half way up and then begin to move apart again.
At the top of the movement (shoulder level), your hands will be roughly in front of your shoulders. As they lower down, your hands will move slightly out (about 6 inches outside of shoulder width about halfway down) and then back in as they are lowered back down to the starting position.
Repeat the narrow zero pattern for the desired number of reps and then reverse the direction for the same number or reps.
HOW TO SAFELY GET OUT OF THE EXERCISE
Lower your arms to your sides, release the band.

COMMON MISTAKES
COMMON MISTAKES
WHAT TO AVOID WITH THE Band Zero Front Raise
KEY TIP:
Guess what? Good news! Many avoids are the same for most movements. Once you learn the basics, there's really only a few extra avoids for each individual movement.
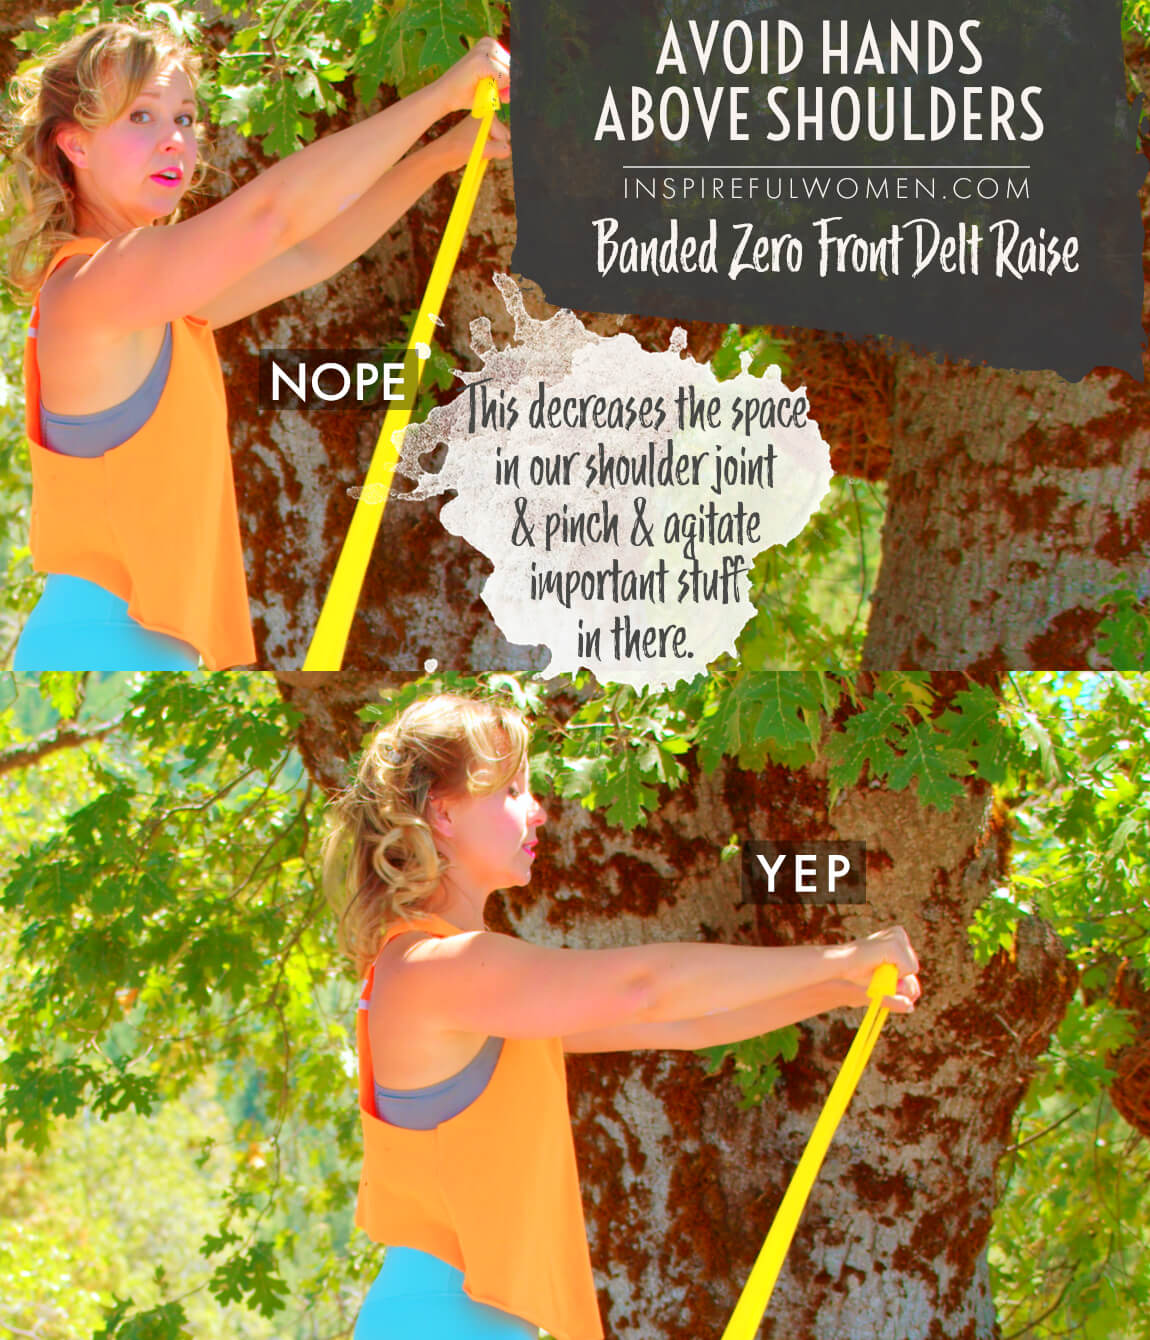
1. Avoid Hands Above Shoulders
AVOID: Lifting your arm higher than 90 degrees (in line with the shoulder).
WHY NOT?
- This can close down the space between the upper arm bone and the shoulder blade/collarbone and can irritate the tendons that pass through this area - shoulder impingement.
WHAT TO DO:
- The torque on the shoulder joint is greatest when the weight is held parallel to the floor, going higher will not increase the amount of work the muscle is doing
- The benefit of lifting higher does not outweigh the risk
2. Avoid Shoulders Rounding
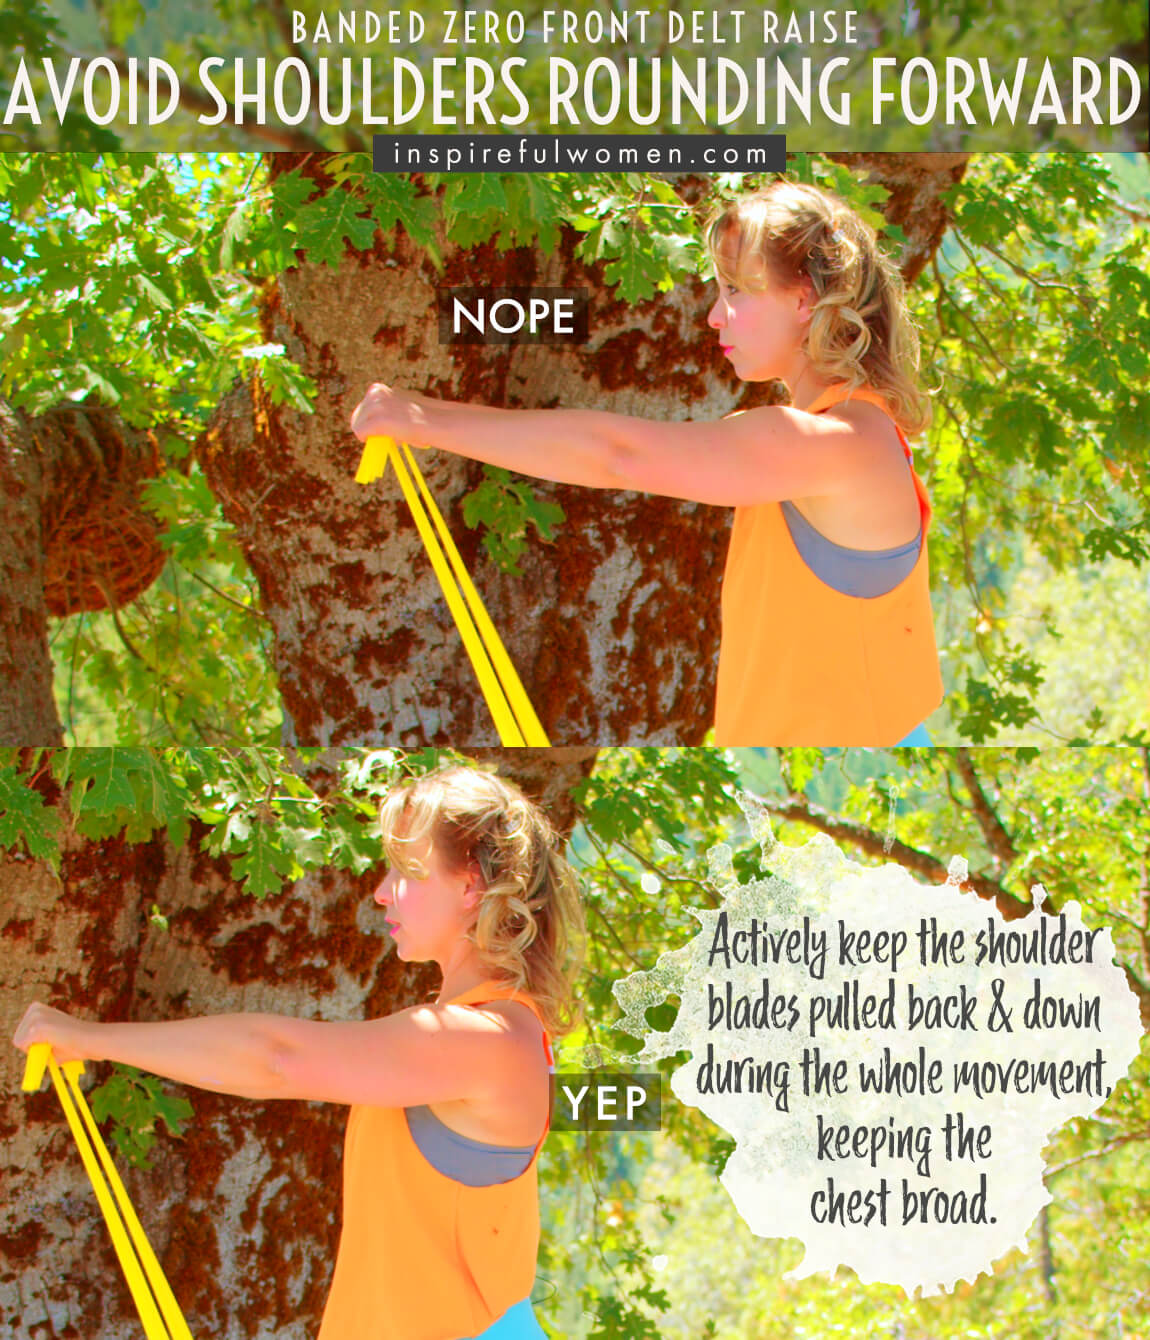
AVOID: Rounding your shoulders.
WHY NOT?
- This would decrease the amount of space between the upper arm bone and the shoulder blade/collarbone and can irritate the tendons that pass through this area.
WHAT TO DO:
- Think of lifting the sternum, opening the chest, and gently engaging the core muscles.
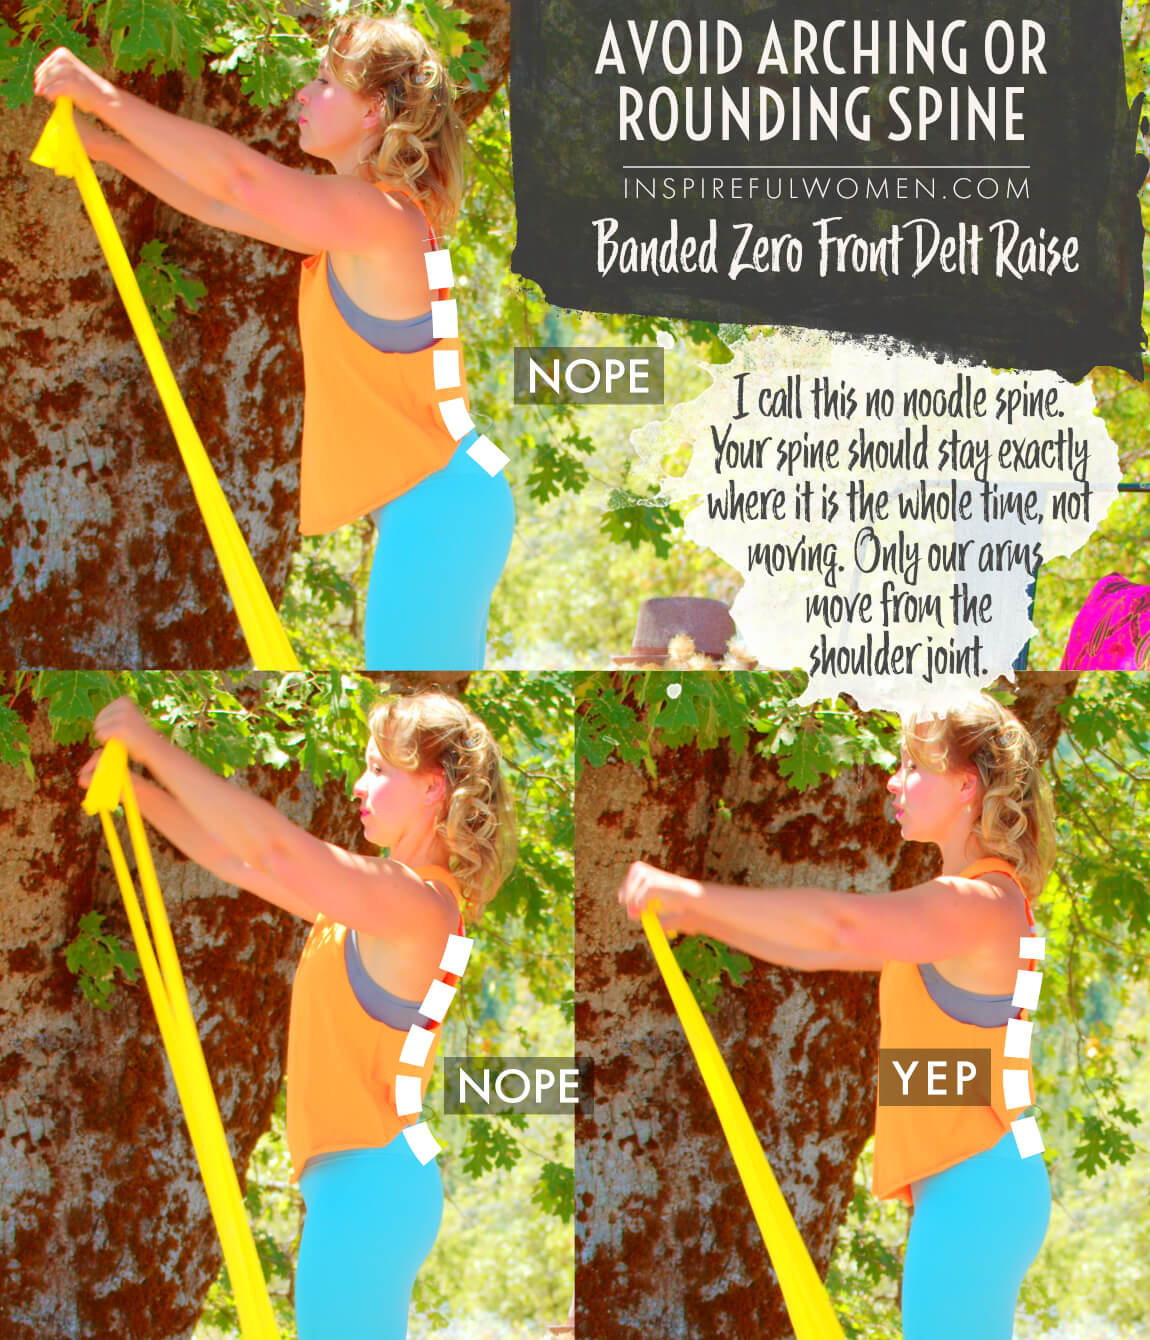
3. Avoid Bending Spine
AVOID: Arching/rounding the spine.
WHY NOT?
- Spine should stay exactly where it is the whole time not moving.
WHAT TO DO:
- Only arms move from the shoulder joint.
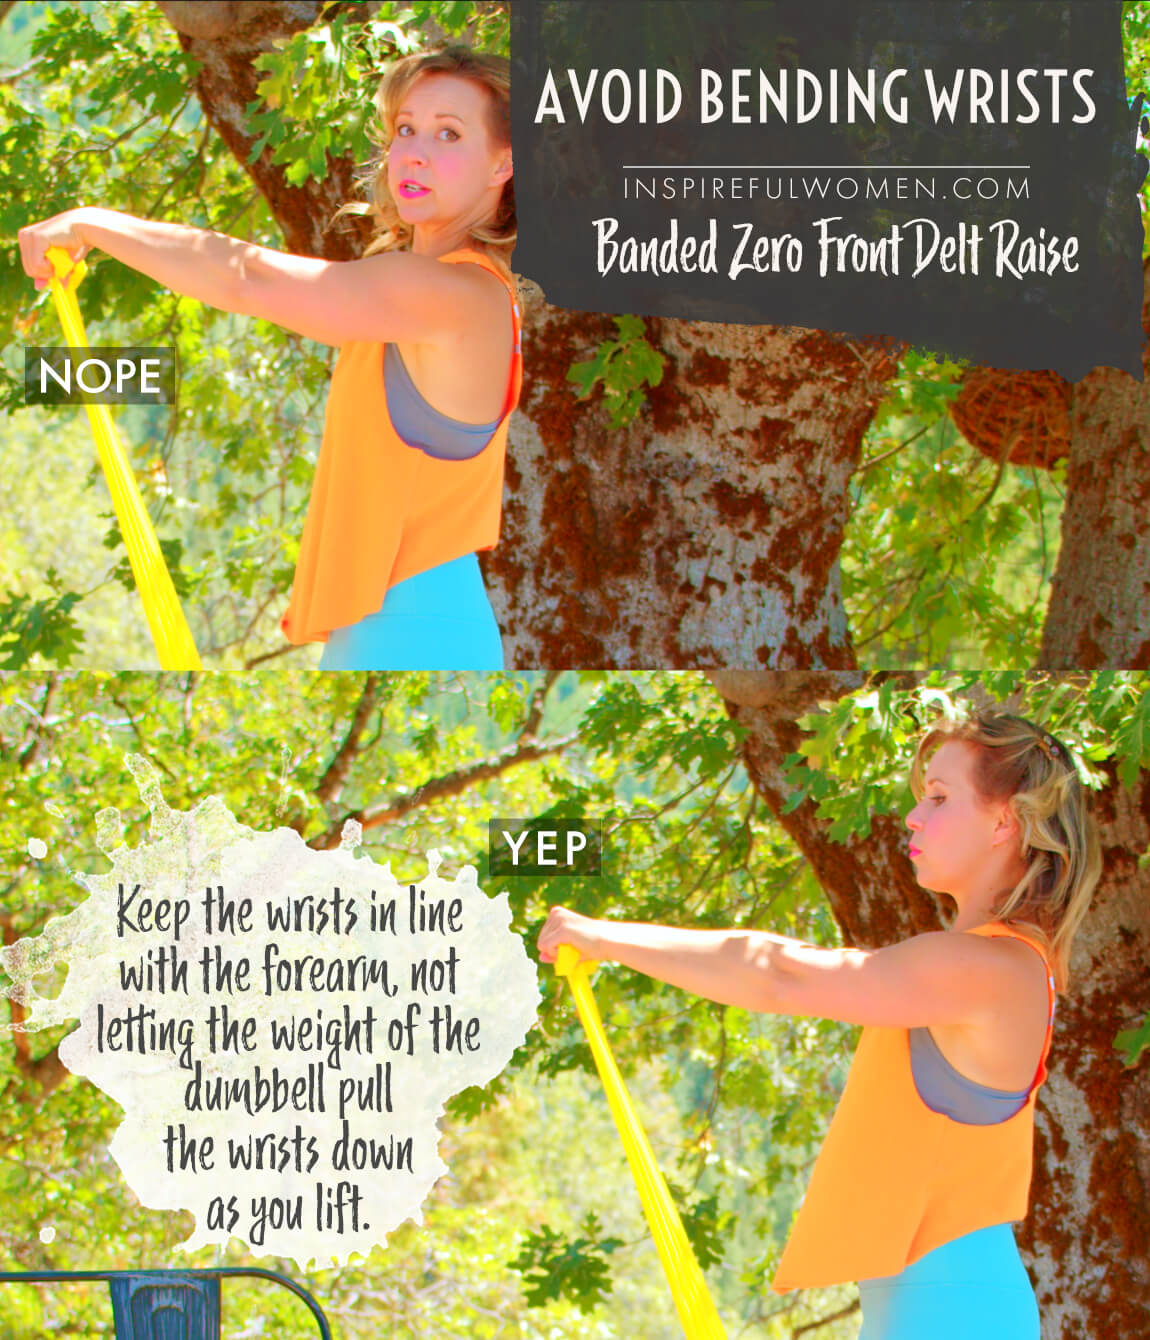
4. Avoid Bending Wrists
AVOID: Bending at your wrists.
WHY NOT:
- Poor alignment (bent forward or backward) or repetitive movement through the wrist can lead to joint and/or soft tissue irritation or injury over time.
WHAT TO DO:
- Your wrists should be in line with your forearm and should be still throughout the exercise.
5. Avoid Locking Knees
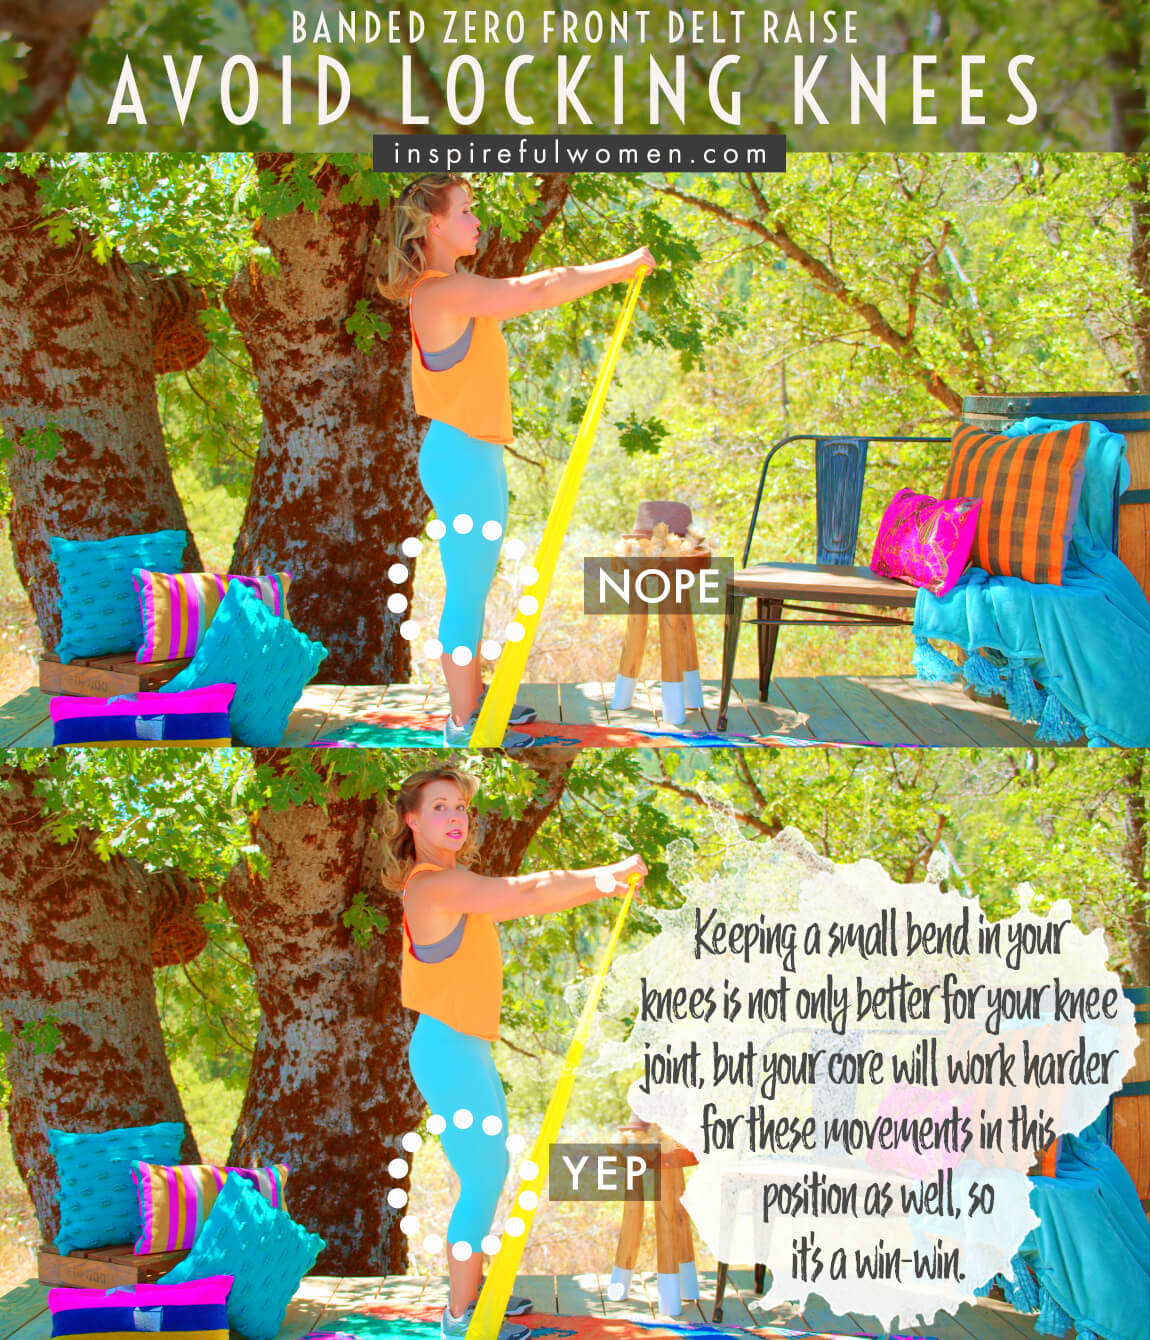
AVOID: Straightening or locking the knees.
WHY NOT?
- This tends to decrease the lumbar curve, pull on the hamstrings and decrease the muscle activity of the legs.
- Locking the knees puts stress on the knee joint and can make it more difficult to maintain a neutral spine.
WHAT TO DO:
- The knees should be soft.
6. Avoid Bending Elbows
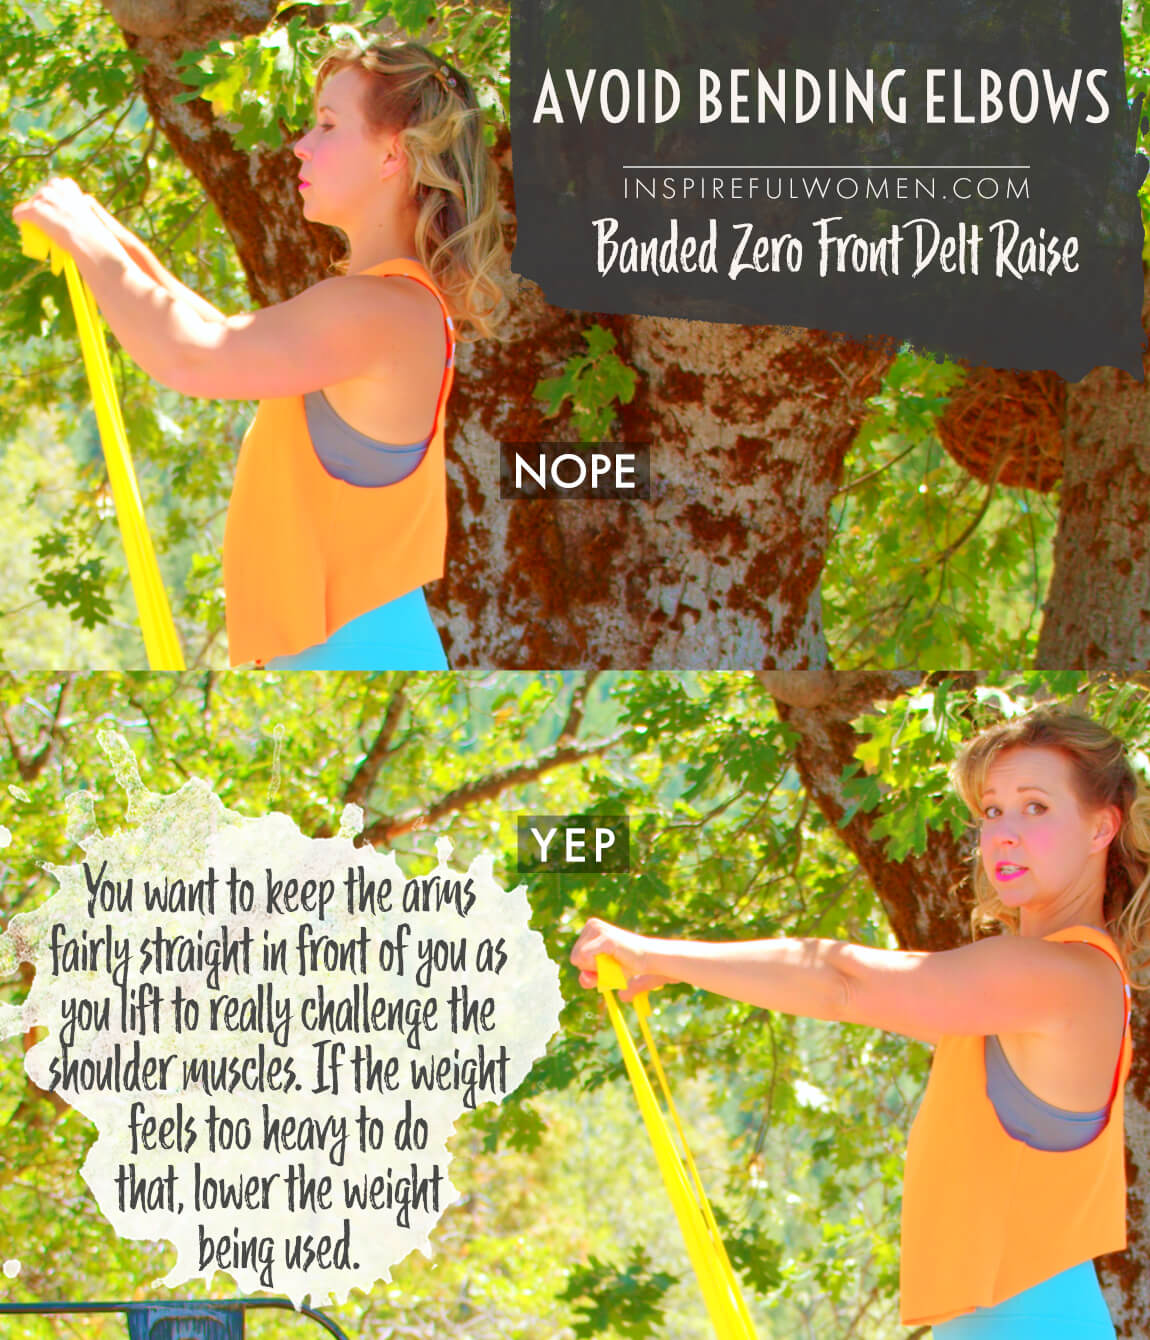
AVOID: Letting the elbow bend.
WHY NOT?
- Bending the elbow will allow the biceps muscle to help out more, decreasing the anterior deltoid activity.
WHAT TO DO:
- It is ok to have a very slight bend in the elbow if that is more comfortable, but it should be small.
7. Avoid Tensing Neck
AVOID: Using your neck muscles.
WHY NOT?
- This can lead to neck strain, injury or damage over time.
WHAT TO DO:
- You may feel neck discomfort, find that you are pressing down with your head, or gripping with your neck muscles.
- Gripping neck muscles in an attempt to stabilize the shoulders: relax the neck and activate the core muscles more, activate the scapular stabilizers in retraction and depression.
WHAT WE'RE DOING TODAY
WHAT & WHY
BENEFITS OF TRAINING THE anterior deltoid
WHAT
Front raises focus on the anterior (aka front) deltoid muscle by lifting the arm straight up and lowering it straight down. This is a really effective way to try to isolate the anterior deltoid. Zero Delt Raises is an exercise that adds just a little variety to the path that is taken during the front raise. Moving the arm in more than one direction during the movement will use more muscles. The chest, upper back, arm, and rotator cuff muscles will be more active.
Zero Front Raises are done in standing, lifting the arms to the front while adding rotation or slight movement to the sides. Pay close attention to the exact path that the arm is taking. Concentrate on the control and stability of the shoulder joint and feeling how the muscles of the upper body are working together. These exercises will be more beneficial if you really work on controlling the movement.
WHY BOTHER DOING IT?
WHY
WHY DO WE EVEN CARE?
WORK MORE MUSCLES TOGETHER THAT USUALLY WORK TOGETHER
One of the benefits of standard front raises is that they do a pretty good job of really isolating the anterior deltoid muscle. The surrounding muscles, the pectoralis major, coracobrachialis, and biceps brachii, are working at a pretty low level as the anterior deltoid does the heavy lifting. Front Raises definitely serve a purpose, but it is a good idea to include exercises in your weekly program that work all of the muscles that support and move the shoulder joint. You can work these muscles by adding a small movement in other directions.
Combining movements, in this case lifting while rotating or moving in and out, will be more challenging for the muscles of the arm, chest, upper back, and rotator cuff. Training all of these muscles to work together will improve motor control, proprioception (your awareness of where your arm is), shoulder stability, and posture.
TRAINS MORE ROTATOR CUFF TOO
The rotator cuff muscles are responsible for centering the top of the upper arm bone in the small cup that is part of the shoulder blade. Training the rotator cuff muscles during arm strengthening exercises helps to promote stability of the shoulder and the healthy movement of the joint needed to prevent injury to the soft tissues and joints.
Lifting the arm straight out to the front is a common movement. We do a lot of heavy lifting straight in front of us, lifting kids, groceries, and heavy boxes. When you lift a lot of weight in front of your body, the muscles on the back of the body need to be able to hold you upright so you don’t get pulled forward. It is important to make sure all of the supporting muscles that help to protect the upper back and shoulder joints are strong enough to support the load that the bigger muscles are capable of lifting.
EVERYDAY LIFE
EVERYDAY LIFE &
MUSCLE FUNCTION
HOW WE USE OUR anterior deltoid IN EVERYDAY LIFE
1. LIFT THE ARM TO THE FRONT
- Lifting a child out of the crib
- Painting a wall with a roller
- Lifting a pan from the oven
- Lifting a gallon of milk out of the refrigerator
2. HOLDING THE ARM IN FRONT OF YOU
- Pushing a wheelbarrow
- Using a can opener
- Carrying a laundry basket
3. TURNING THE UPPER ARM INWARD (ESPECIALLY WHILE LIFTING OR HOLDING THE ARM TO THE FRONT, ELBOW STRAIGHT)
- Using a screwdriver
- Closing a spigot
- Using a wrench
4. STABILIZES THE SHOULDER JOINT, PROTECTS AGAINST A DOWNWARD FORCE
- Holding heavy items to the side
- Suitcase
- Weights
- Bucket
- Balancing the force of the pectoralis major or latissimus dorsi
- Swimming
- Pulling yourself up on a ladder
HOW TO FEEL WHAT MUSCLE IS WORKING
How to Feel What Muscle is Working
Place your fingers of one hand on the top of the opposite shoulder towards the front. Place the other hand under a stationary object, like the top of a table or the arm of a chair. Lift the arm forward and up. You should feel the muscle fibers contract under your fingers.
SCIENCY STUFF
SCIENCY STUFF
SPIFFILICIOUS FACTS ABOUT MUSCLES & MOVES
The deltoid muscle is the most visible muscle in the shoulder region. The deltoid originates on the shoulder blade (scapula) and the collarbone (clavicle) and attaches to the upper arm bone (humerus), its primary function is to lift the arm. The muscle is frequently described as three different portions - the anterior (front) fibers, the middle fibers, and the posterior (rear) fibers. The position of the muscle fibers will determine their action. The anterior or front fibers act to lift the arm up to the front and rotate the arm inward. The deltoid helps to stabilize the shoulder joint, especially against a downward pull from gravity, or the pull of the strong lats and pectoralis major muscles.
ALLLL MUSCLES & WHEN
ALL MUSCLES WORKING & WHEN DURING THE Band Zero Front Raise
The core stabilizers work to hold the spine in a neutral position throughout the exercise. The muscles of the forearm (extensor carpi radialis longus and brevis, extensor carpi ulnaris) will work isometrically to hold the wrist in a neutral position.
The movement of the arms begins with the arms in front of the hips. The scapular stabilizers hold the shoulder blades down and in.
The anterior deltoid along with the biceps, coracobrachialis, and upper fibers of the pectoralis major contract concentrically to lift the arm up. As the arm is lifted the pectoralis major and coracobrachialis will contract concentrically to move the arms towards midline (horizontal adduction) as they follow the first half of the pattern.
At the top of the zero the lateral deltoid will become more active (concentric contraction) to move the arm out to the side (horizontal abduction). The lateral deltoid and supraspinatus work eccentrically to control the movement as the band pulls the arm back down to the starting position.
When the pattern is reversed the supraspinatus and lateral deltoid will work concentrically along with the anterior deltoid (biceps, pectoralis major and coracobrachialis to some extent also - depends on the exact path and weight) to lift the arm up along the curving path.
The anterior deltoid, biceps brachii, coracobrachialis, and superior fibers of the pectoralis major work eccentrically to lower the arm back down along the inward curving path to the starting position.
When the arm is moving through the pattern, the muscles of the shoulder blade and rotator cuff will be making continuous adjustments to their activity to keep the head of the humerus centered in the glenoid fossa, and to keep the shoulder blade positioned and stabilized in the best position for the muscles moving the arm.
PIN IT FOR LATER!


