Single Leg Band Seesaw - Core
How to Do the Beginner Standing Single Leg Band Seesaw Core Exercise | In-Depth Guide [VISUAL LEARNERS] Beginner
Proper Form, Common Mistakes + Easier & Harder Variations | Home Resistance Training
WHAT DO YOU WANT TO SEE?
QUICK DEMO
QUICK DEMO
MUSCLES THIS WORKS
MUSCLES
MAIN MUSCLES WORKED IN the Single Leg Band Seesaw
ERECTOR SPINAE & TRANSVERSE ABDOMINIS
OTHER MUSCLES WORKED:
- Quadratus Lumborum
- Latissimus Dorsi
- Gastroc
- Soleus
- Upper Back Muscles (Mid trap, Rhomboids, Rear Delt)
- Gluteus Maximus
- Hamstrings
STARTING POINTERS
Starting Pointers
WHAT WE'RE DOING TODAY
ALL WE'RE DOING:
Holding a band, we'll raise our arms high in the air & bring them low
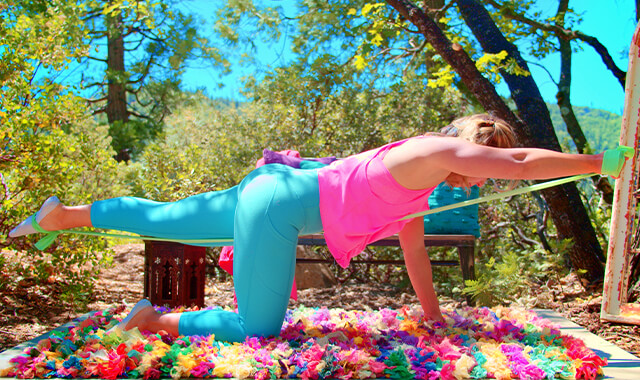
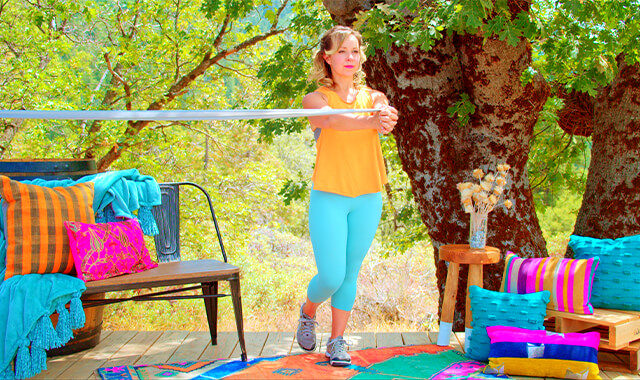
This is an advanced version of the Band See-Saw. This core strengthening exercise is done standing on one leg. Grab a resistance band, find a suitable anchor point, and challenge yourself with the single-leg band seesaw. Strengthen your lower body, improve your balance, and enhance your overall stability.
This movement should be very controlled, as stable as possible, smooth and continuous - like a See-Saw, hinging forward and pulling the arms down, standing back up and lifting the arms overhead. If you are having trouble getting the rhythm of the movement, try it without using the band in the beginning. If you have any restrictions in your shoulders or upper back, you don’t need to lift your arms all the way up overhead, just stop where they feel comfortable.
HOW TO DO THE EXERCISE
LOOKS
HOW the Single Leg Band Seesaw SHAPE OUR BODY
Nice upright posture, graceful movement, toned waist. Toned buttocks and shoulders.
PROPER FORM
PROPER FORM: Single Leg Band Seesaw
EQUIPMENT, SETS & REPS
EQUIPMENT
Main set (3: Light/Med/Heavy)
X-Heavy Band (I recommend getting this too if you plan to use resistance bands frequently).
SUGGESTED STARTING WEIGHT FOR WOMEN:
Light resistance.
SETS & REPS:
6-8 reps on each side.
PACE:
Controlled, smooth, and continuous movement.
BODY POSITION
BODY POSITION FOR THE Single Leg Band Seesaw
BAND: Anchored between waist and knee level in front of you.
LEGS: Lift one foot from the floor by slightly bending your knee - try not to let your lifted leg rest against your working leg. Toes of the foot of your working leg facing forward. Your knee slightly bent.
BODY STANCE: Neutral spine position, knees slightly bent, sternum lifted, shoulder blades in and down the back, space between the top of your shoulders and your ear lobe. Chest wide - this is important to avoid rounding your shoulders in. Abdominals gently engaged.
GRIP: Hold one end of the band in each hand with a neutral grip.
ARMS: Arms shoulder width apart in front at midline - lifted up so that your hands are approximately in line with your belly button Elbows can be straight or just slightly bent. Step back until the band is taut.
HOW TO DO
HOW TO DO Single Leg Band Seesaws
CUE: When you hinge forward your non-working leg lifts up in line with your torso - it will be straight out behind you when you are pulling your arms back.
Hinge forward at your hips, keeping a neutral pelvis and spine.
As you hinge forward and move your arms back, one hand will be on each side of your standing leg. Your knee will bend a little bit as you hinge.
Reverse your hip hinge to return to upright standing. Your knee straightens, but not quite all the way - keep the focus on your core muscles.
As you stand up, raise your arms up overhead (within comfort).
Hinge at your hips and pull your arms back down.
Repeat this see-saw movement for the desired number of repetitions.
HOW TO SAFELY GET OUT OF THE EXERCISE
From the standing position, release the band.


COMMON MISTAKES
COMMON MISTAKES
WHAT TO AVOID WITH the Single Leg Band Seesaw
KEY TIP:
Guess what? Good news! Many avoids are the same for most movements. Once you learn the basics, there's really only a few extra avoids for each individual movement.
1. Avoid moving shoulders up/down as arms move Up
AVOID: Moving your shoulders up and down as the arms move overhead.
WHY NOT?
- This will interfere with the proper movement of the shoulder joint which can result in soft tissue or joint irritation, injury, or damage over time.
WHAT TO DO:
- The shoulder blade will rotate up or down (that is the natural movement) but avoid lifting the shoulders up
- Maintain good posture with the sternum lifted, space between your earlobe and the top of the shoulder.

2. Avoid locking knees
AVOID: Straightening or locking the knees.
WHY NOT?
- Most commonly happens when you are standing up from a hinged position.
- Straightening the knees can make it difficult to maintain a neutral spine.
- Extending the low back can increase the pressure on the joints of the spine and cause irritation or injury over time.
WHAT TO DO:
- The knees should be soft.

3. Avoid bending your spine
AVOID: Arching or flattening your low back.
WHAT TO DO:
- Maintain a neutral spine position to prevent low back joint injury, muscle strain or damage over time.
- If your ribs lower ribs flare upwards or your belly is lifted up - this indicates you are arching your low back.
- Most common when your arms are overhead and you are lifting the resistance overhead.
- Activate your rectus abdominis to keep the spine neutral.
- Avoid taking the arms up too far overhead: bring your arms down a little bit.
- Flattening/rounding your low back is most common during the hip hinge and pulling of the resistance between the legs.
- Lift your sternum
- Pull your shoulder blades together and down the back.


4. Avoid pushing arms back too far
AVOID: Pushing the arms back when your shoulders are tight.
WHY NOT?
- Many people have tight shoulders or upper backs.
- It may feel like a hard stop.
- Pushing tight shoulders back can irritate the soft tissues and joints.
WHAT TO DO:
- When taking the arms back overhead, stop when you feel discomfort or tightness in the shoulder joints.
- Check your shoulder range of motion in standing prior to doing the exercise.
- When you do the exercise, limit how far you lift the arms to your discomfort-free range of motion.

MAKE IT HARDER
HARDER
MAKING THE Single Leg Band Seesaw MORE CHALLENGING
no shoes
Barefoot
This will make the stabilizing muscles work much harder as well as challenge your balance.

MAKE IT EASIER
EASIER
MAKE THE Single Leg Band Seesaw MORE DOABLE
PARTIAL ARM MOVEMENT
Hands Less Overhead
Only move the arms partway overhead. This is a good option if you are limited in shoulder range of motion, thoracic spine range of motion, core weakness, or shoulder weakness or pain. Move the arms up only as far as you are able to maintain proper form and you don’t have any discomfort.

WHAT WE'RE DOING TODAY
WHAT & WHY
BENEFITS OF TRAINING THE core MUSCLE
WHAT
FULL BODY WORKOUT
The See-Saw is an advanced core exercise. It is a full-body workout - using the muscles of the feet all the way to the neck. You should be very familiar with activating the muscles to hold the spine in a neutral position (the Bird Dog & Dead Bug core exercises are good for learning this), and also be able to do a good hip hinge movement (learning the Romanian Deadlift is good for this) before trying this one. The movement begins in upright standing. As you hinge forward, you pull the hands back between your legs. Reversing the movement, you straighten back up and lift the hands overhead. The spine is moving from a vertical position into a horizontal position - this will increase the downward pull of gravity and the muscles on the back of the body will contract to prevent you from falling forward, or the spine from sagging down.
Adding arm movement will not only make the back muscles work harder, but it also challenges your motor control and works the upper back and arm muscles.
I love this because many training programs, especially home ones, have difficulty focusing on the muscles of our backside as well, in part because of the difficulty in getting our bodies into a position where these muscles will be challenged.
This exercise works our back extensor muscles, specifically what’s called our erector spinae- a group of muscles that lie alongside either side of our spine - these muscles work to keep our back from rounding in 2 ways with this move:
- At the top of the movement, the band is pulling us forward, so the muscle work to counteract that to prevent our spine from rounding
- As our torso moves downward, gravity starts to pull at our torso & the muscles have to work against gravity to keep the spine from rounding as well.
It is helpful to note that all of the muscles that hold the spine in a neutral position will be active, but the muscles on the backside of the body will be challenged more than the abdominal muscles.
WHY BOTHER DOING IT?
WHY
WHY DO WE EVEN CARE?
WHAT’S TO LOVE ABOUT EXERCISES FOR YOUR BACK
It is pretty common for the muscles on the back side of the body to be weaker, and even neglected in workout programs. The classic symptom of weak posterior muscles is poor posture - slouched forward, flat lower back, standing with locked knees, rounded shoulders, and even the head leaning forward. This position puts a tremendous amount of strain on the spine. When you stand up nice and tall, the ligaments, joints, and muscles of the spine can maintain the position with very little stress. But with poor posture due to weakness of the back side, the weight shifts forward, and the stress on the ligaments, joints, and muscles increases. This can be very fatiguing to the body. Moving becomes more difficult and over time, the stress on the support structures of the spine can become damaged and less effective.
Anytime that we lift, carry, push, or pull items in front of us, the muscles on the back of the body must work harder to hold us in the safest, most effective, and most efficient position possible. The See-Saw movement trains the muscles of the core to stabilize the spine during movements of the hips and shoulders under load (band or dumbbells). The role of the trunk is to provide a stable base of support for the arms and legs to work from. When you hold the spine still in a neutral position, all of the muscles need to work together. When you add arm and leg movements, the muscles need to make continuous changes to accommodate the changing forces because of the movement.
Strengthening the muscles on the back side of the body will improve your ability, and increase the safety of doing other strength training exercises like deadlifts, squats, and overhead presses. Although the focus of this movement is the muscles on the backside of the body, all of the muscles that hold the spine will be working together, this includes the muscles on the front of the torso, the transverse abdominis, and the obliques. As the resistance increases, more muscles will be getting involved to hold the torso still.
This exercise also works the hip extensors (gluteus maximus, adductor magnus, and hamstrings) and the shoulder flexors (anterior deltoid, biceps, pectoralis major, coracobrachialis).
EVERYDAY LIFE
EVERYDAY LIFE &
MUSCLE FUNCTION
HOW WE USE OUR core MUSCLES IN EVERYDAY LIFE
1. THE MUSCLES OF THE BACK, UPPER BACK, LEGS (FROM THE NECK TO THE FEET), AND ARMS NEED TO WORK TOGETHER TO HOLD OUR SPINES STABLE DURING:
- Painting walls with rollers and brushes
- Hanging string lights- anything where you are having to reach & move arms up & down and away in various ways
- Washing windows
- Lifting objects (especially heavy objects from the floor and overhead)
- Carrying heavy objects in front of you
- Vacuuming
- Laundry - especially heavy WET laundry- like sheets & your hubby's thick work pants!
- Folding heavy blankets
- Carrying in firewood
- Putting firewood in the stove
- Moving patio furniture around
- Pushing a wheelbarrow
- Shoveling
SCIENCY STUFF
SCIENCY STUFF
SPIFFILICIOUS FACTS ABOUT MUSCLES & MOVES
When you are standing up tall with good posture, your weight is distributed straight down from head to feet, with the line of gravity falling just in front of the ankles. The muscles on the back of your legs and hips are active to prevent you from falling forward. This is a very small amount of activation and the soleus muscles in the calf are the most responsible for holding you upright when you are just standing. As soon as you lean forward or add weight in front of the body, the muscle activity on the backside of the body will increase.
ALLLL MUSCLES & WHEN
ALL MUSCLES WORKING & WHEN DURING THE Single Leg Band Seesaw
The core stabilizers (erector spinae, rectus abdominis, multifidi, quadratus lumborum, obliques, transverse abdominis) work
to hold the spine in a neutral position throughout the exercise. Rotator cuff (infraspinatus, supraspinatus, subscapularis, teres
minor) to stabilize the shoulder joint as the arm moves. The scapular retractors (rhomboids and mid traps) and depressors (latissimus dorsi, lower traps, pectoralis, and ant serratus) position the shoulder blades.
The exercise begins with a hip hinge: the back extensors, lower leg muscles (gastroc/soleus), hamstrings, and gluteus maximus work eccentrically as the upper body leans forward. The back extensors (erector spinae) become more active as the torso moves closer to parallel to the floor.
The pectoralis major, triceps, and lats move the arms and move the arms back between the legs. The shoulder blades are rotated downward by the latissimus dorsi, rhomboids, levator, and pectoralis muscles.
Concentric contraction of the hamstrings, adductor magnus, and gluteus maximus extend the hips to return the torso to an upright position.
The arms reach up (flexion): the anterior deltoid, biceps brachii, coracobrachialis, and pectoralis major work concentrically, and the serratus anterior and trapezius rotate the shoulder blade upward. The muscles of the forearm will work isometrically to hold the wrist in a neutral position.
The rectus abdominis, transverse abdominis, and obliques contract to hold the spine in neutral against the force of the backward pull of the arms overhead.
The anterior deltoid, biceps brachii, coracobrachialis, and superior fibers of the pectoralis major work eccentrically to lower the arm back down to the starting position (hinging at the hips).
PIN IT FOR LATER!

