Lunge Pallof Press
How to Do the Band Lunge Pallof Press - Anti-Rotation Core Exercise | In-Depth Guide [VISUAL LEARNERS] Advanced
Proper Form, Common Mistakes, & Variations | Home Resistance Training
WHAT DO YOU WANT TO SEE?
QUICK DEMO
QUICK DEMO
MUSCLES THIS WORKS
MUSCLES
MAIN MUSCLES WORKED IN the Lunge Pallof Press
Obliques & Quadratus Lumborum
OTHER MUSCLES WORKED:
- Transverse Abdominis
- Erector Spinae
- Multifidi
- Latissimus Dorsi
- Iliopsoas
- Rectus Abdominis
STARTING POINTERS
Starting Pointers
WHAT WE'RE DOING TODAY
ALL WE'RE DOING:
I can't in good conscience say "all" today - this move involves a lot. Both a core exercise + a lunge?? But boy, it's a great way to work your whole body at once. I recommend only doing it for 10-15 reps at time!!
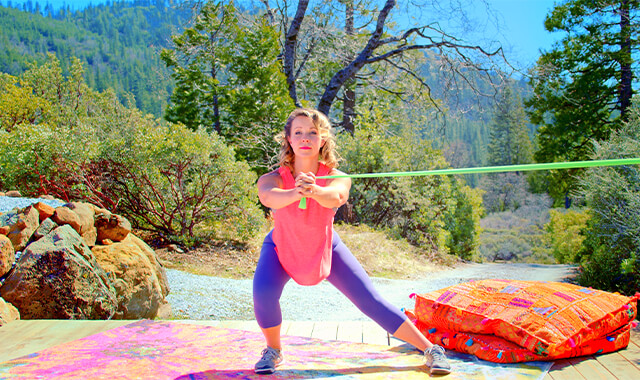
This advanced version of the Pallof Press adds a reverse lunge to the exercise. The variation will work the leg and core muscles more than the standing Pallof Press. It will also challenge your balance and coordination. Anti-rotation pallof press to lunge can hone your core strength, stability, balance, and coordination.
In the standard Pallof Press, the legs are still while the arms move. In this version, the arms remain and you move your legs. The pull of the band changes as you lunge back - in the standard Pallof Press the band pulls your torso to rotate towards the side where the band is anchored. By adding a reverse lunge, the band is not only pulling you into rotation but also diagonally.
This is a great way to teach your body to keep the torso still while you move more joints and muscles against forces that are changing directions. This is a really functional activity. When we move through life we are moving our legs and arms at the same time, squatting down, lunging forward, while lifting and carrying.
HOW TO DO THE EXERCISE
LOOKS
HOW Lunge Pallof Presses SHAPE OUR BODY
Toned, slimmer waist and flat abdomen. Training these side core muscles can really help create a more tapered waist because the obliques run diagonally around the sides of the torso. Upright healthy posture and more effortless, energetic (youthful looking) movement.
PROPER FORM
PROPER FORM: Lunge Pallof Presses
EQUIPMENT, SETS & REPS
EQUIPMENT
Main set (3: Light/Med/Heavy)
X-Heavy Band (I recommend getting this too if you plan to use resistance bands frequently).
SUGGESTED STARTING WEIGHT FOR WOMEN:
Moderate weight until the form is perfect. - Choose the strength of the band so that it provides resistance and you feel the core working.
SETS & REPS:
1 set of 8 lunges on each leg then switch so the anchor is on the other side for another set of 8 lunges on each leg for a total of 16 lunges on each leg.
PACE:
Controlled movement - these muscles are postural endurance muscles - they need to work at a low level for long periods of time.
BODY POSITION
BODY POSITION FOR THE Lunge Pallof Press
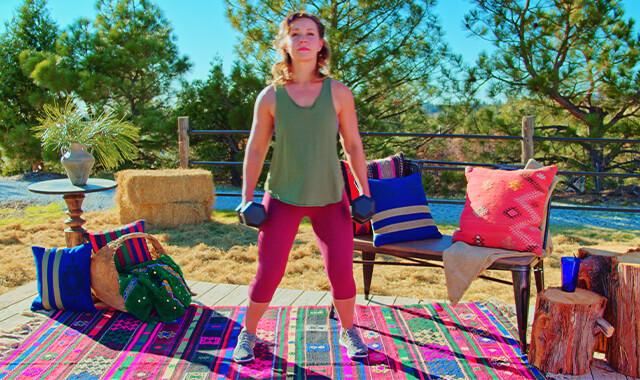
BAND: Mount the resistance band at chest height.
Standing sideways to the band. The anchor should be in line with the shoulders/torso.
HANDS: Holding both ends of the bands with both hands, fingers interlaced, or one over the other - comfortable and secure grip.
FEET: Shoulder width apart. Toes pointed forward.
BODY STANCE: Shoulders and hips squared to the front. Neutral spine and neck, sternum lifted, bring the shoulders blades in and down the back, chest wide.
ARMS: Hold so that your upper arms are by your sides (neutral shoulder flexion) and hands are clasped at chest level.
Shorten up the band or move out to the side until there is tension on the band.
HOW TO DO
HOW TO DO Lunge Pallof Presses
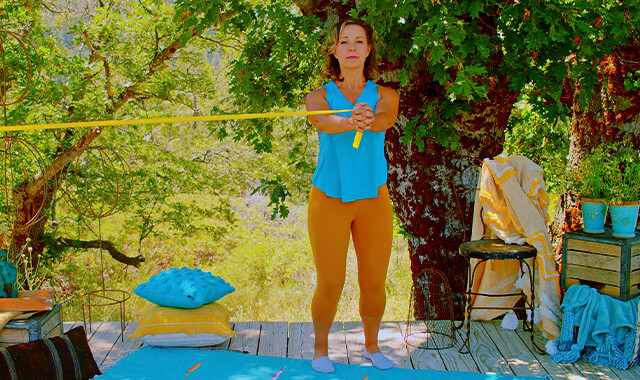
CUE: Most beneficial if done slowly with control.
Push your hands forward until your elbows are straight.
Take a step backwards with one leg, while keeping about 75% of your weight over your front foot. As you step backwards, hinge forward slightly at the hips and maintain a neutral spine. The toes of the back foot will be on the floor and the heel is lifted. Lower down to lunge on the front leg. Keep your arms still.
Keeping your arms out to the front, push through your front foot to straighten the knee and hip. Step forward with the back leg to complete the lunge. Continue to lunge up and down to complete the desired number of lunges. The arms do not move.
Step forward with the back leg. Step back with the other leg and repeat.
After you have completed the desired number of reps in the set, turn around so the band is anchored on the other side for the second set - lunging on one leg for the desired number of reps and then switch to the other leg.
HOW TO SAFELY GET OUT OF THE EXERCISE
From the standing position - both legs together - release the band.


COMMON MISTAKES
COMMON MISTAKES
WHAT TO AVOID WITH THE Lunge Pallof Press
KEY TIP:
Guess what? Good news! Many avoids are the same for most movements. Once you learn the basics, there's really only a few extra avoids for each individual movement.
1. Avoid Rotating Or Bending Your Spine
AVOID: Avoid rotating or bending your spine.
WHY NOT?
- Repetitive rotation or bending of the spine under load (resistance of the band) can cause soft tissue/joint irritation or damage over time.
- Allowing movement will decrease the effectiveness of the exercise.
- The goal is to keep the torso still as the hands move in and out - this will work the core muscles.
WHAT TO DO:
- The hips and shoulders should stay in one plane and squared to the front (where you are facing).
- The torso should be still - no movement.


2. Avoid Rounding Shoulders
AVOID: Avoid rounding your shoulders.
WHY NOT?
- This happens when the shoulder blades are pushed forward when the hands are pushed forward (the end of the movement).
- The goal of the exercise is to strengthen the postural muscles in the best position possible.
- Protraction (pulling your shoulder blades forward around the rib cage) will promote a rounded upper back and rounded shoulder posture - this is not a healthy position.
WHAT TO DO:
- Hold the shoulder blades in and down the back, keep the sternum lifted, and space between your earlobes and the tops of your shoulders.


3. Avoid moving through the wrists
AVOID: Avoid bending at your wrists.
WHY NOT?
- Poor alignment (bent forward or backward) or repetitive movement through the wrist can lead to joint and/or soft tissue irritation or injury over time.
- Letting the wrists bend will decrease the core muscle activation
WHAT TO DO:
- Keep wrists in line with the forearm and still throughout the exercise.

4. Avoid Shoulders Hunch
AVOID: Avoid letting the shoulders move up towards the ears.
WHY NOT?
- This can happen when the core is weak - other muscles try to help.
- This will decrease the activation of the postural muscles (mid and lower back, and core), and increase the activation of the neck muscles.

5. Avoid letting toes turn out
AVOID: Avoid turning the toes out.
WHY NOT?
- Turning the toes out can affect which muscles you are using.
WHAT TO DO:
- Keep the toes of the feet pointing forward.

6. Avoid Knees caving In/Out
AVOID: Avoid letting the knee collapse in or out.
WHY NOT?
- This puts too much strain on the ligaments on the sides of the knee joint.
- A goal of the exercise is to work the muscles and train the body to move with proper form, this includes the alignment of the leg.
WHAT TO DO:
- Keep the thigh in line with the knee, in line with the lower leg and ankle.
- The center of the kneecap should line up with the second and third toes (approximately).

7. Avoid hips dropping
AVOID: Avoid letting the hip of the front leg fall out to the side.
WHAT TO DO:
- Keep the pelvis level, not dropping the hip out during the exercise.
- This will teach poor posture/body mechanics.
- If possible, check your posture in a mirror.

8. Avoid Foot Rolling In or Out
AVOID: Avoid letting either foot roll to the inside or the outside of the foot
WHY NOT?
- This can strain the ligaments of the side of the ankle.
- Will decrease the effectiveness of the exercise by putting the ankle joint in poor alignment under a load (weight/partial weight of body)
- The goal is to strengthen the leg muscles in good alignment of the hip, knee and ankle
WHAT TO DO:
- Keep feet flat on floor, weight evenly distributed across each foot.

9. Avoid Stopping Short
AVOID: Avoid not bringing the hands all the way to the middle of the chest.
WHY NOT:
- Not bringing them to the middle will lessen the effect of the exercise (less control and less resistance from the band).
WHAT TO DO:
- Make sure that you are bringing the hands all of the way to the middle of your chest - in line with the breast bone (sternum).

VARIATIONS
VARIATIONS
VARIATIONS OF Lunge Pallof Presses
Iso Hold
Isometric Hold
Lunge down and hold the position. Move your hands back towards your chest and complete 8 reps of straightening and bending the arms while maintaining the squat position. This will work the leg muscles isometrically to maintain the lunge. Repeat with the other leg.

Combo Lunge pallof press
Combo Pallof Press Lunge
In standing complete 2 reps with arms - press out pull in x 2; Lunge down with arms out, complete 2 reps with arms - pull in and press out x 2; With arms out stand back up and repeat.

lunge+pallof press each
Lunge + Pallof Press Each rep
Push arms out as you lunge then pull them back in as you stand. Challenges core stability, motor control and balance. Alternate the legs for an added challenge. This should be done with slow control with attention on form and stability.

WHAT WE'RE DOING TODAY
WHAT & WHY
BENEFITS OF TRAINING THE CORE MUSCLEs
WHAT
WORKS THE SIDES OF YOUR CORE WELL
Let me start by saying this is one of my favorite core exercises. I keep a band mounted at the right height in my workout spot at all times so that I can do it frequently with no set-up time. I literally do this at least twice a week.
The Pallof Press is a great exercise for safely and effectively training your core muscles. The Pallof Press trains your muscles to hold the spine stable in neutral alignment - not bending forward or backward, to the side or twisting. The goal is to hold the body still against the resistance of the band pulling you into rotation.
Pallof Presses work all of the muscles of the torso but specifically target the muscles that prevent your torso from rotating (the obliques) and sidebending quadratus lumborum.
It is easy to modify this exercise for all different ranges of core strength, from the beginner to the advanced exerciser.
WHY BOTHER DOING IT?
WHY
WHY DO WE EVEN CARE?
TEACH THE CORE NOT TO GET PUSHED AROUND BY THOSE BOSSY ARMS
The Pallof Press trains the muscles of the trunk to work together to hold upright and stable posture during movement of the arms. If we don't have a strong, stable core, when we move our arms or lift heavy things, our torso will just end up going whichever direction our arms went.
How this exercise is different from woodchoppers: The pallof press is holding the torso still against a rotational force - one plane - the transverse plane. Woodchoppers stabilize the torso against forces in three planes because the arm moves diagonally- through the sagittal plane, the frontal plane and the transverse plane.
TEACH MOVEMENT PATTERNS TO FIT WITH HOW OUR BODIES WERE DESIGNED TO WORK
The main job of the spine is to hold the torso still so the arms and legs can move.
If you look at the way the spine is designed you will see layer upon layer of ligaments and discs in between each vertebra - all designed to stabilize the spine. The spine is like a large I-beam - designed for support - not for a lot of movement. The joints of the spine are small, designed to move millimeters - which is very different from the large ball and socket joints of the shoulders and hips that are designed for lots of movement. Safe and effective exercises should work the different joints and muscles of the body based on how they are used, their function.
WHY BETTER THAN SIT-UPS
Some traditional exercises like sit-ups, involve holding the arms and legs still while bending through the spine over and over again. This is not functional. These exercises involve repetitive movement at one or two segments of the lower spine, this movement can stretch the important ligaments of the spine leading to excessive movement at that level and damage to the joints and tissues over time. Most back pain is a result of instability or too much movement in the spine.
This exercise works the muscles in a neutral spine position. This is the healthiest position for the spine - the position with the least amount of stress on the joints, discs, nerves, and ligaments. And, it also happens to be the most functional position - the position that we should hold our spines in when we walk, sit, run, lift, squat, etc.
GOOD SPINE STABILITY PREVENTS INJURY
Upright posture and spinal stabilization (good core strength) are needed to prevent injury to the joints of the spine; this is especially the case when you are bending and twisting as you lift and move heavy objects.
The obliques - the muscles that rotate and stabilize against rotation, and the quadratus lumborum, the muscles that side bend and stabilize against side bending, are especially important in the prevention of injury during lifting. The Pallof press targets these muscles, along with all of the other core muscles.
This exercise is frequently used in physical therapy for the treatment and prevention of low back pain - because it teaches people how to hold their spine in a neutral position and trains the muscles to hold the position while they use their arms.
EVERYDAY LIFE
EVERYDAY LIFE &
MUSCLE FUNCTION
HOW WE USE OUR core MUSCLES IN EVERYDAY LIFE
The main job of the obliques and quadratus lumborum muscles is to hold the spine upright and stable in order to use our arms and legs. They work with all of the other core muscles to do this.
1. OBLIQUES
- Holds the trunk stable and in upright posture against bending backwards (extension) and rotation forces
- Catching a ball or frisbee
- Walking a large dog that is behind you and pulling to the side
- Walking up hill (gravity will pull the torso back and the obliques will hold the spine up (preventing extension)
- Riding a bike going around a corner
- Forward bending (flexion) and rotation of the trunk
- Buckling your seatbelt
- Unloading the dishwasher, dryer
- Bending over and tying your shoe
- Swinging a golf club
- Compression of the abdomen
- Keeping upright and stable posture during all activity
- Does provide some support for the abdominal organs to improve their function
2. QUADRATUS LUMBORUM (QL for short)
- Holds the trunk stable and in upright posture against side bending (lateral flexion) forces
-
- Carrying a heavy object on one side: suitcase, grocery bag, car seat
-
- Walking on the side of a hill
-
- Riding a bike around a corner
- Side bending (lateral flexion) of the trunk
-
- Leaning over to the side while sitting to pick up something that fell
-
- Reaching overhead with one hand
- Breathing in (inspiration)
-
- Holds the ribs stable so the diaphragm can expand as the air comes in
HOW TO FEEL WHAT MUSCLE IS WORKING
How to Feel What Muscle is Working
Obliques: Put a hand on your waist and push against a heavy object, as if you were pushing it horizontally to the left - you should be able to feel your obliques contract under your hand.
Quadratus Lumborum: Put a hand on your back side between your pelvis and ribs. Pull up on a heavy object with the opposite hand. You should be able to feel the quadratus lumborum under your hand.
SCIENCY STUFF
SCIENCY STUFF
SPIFFILICIOUS FACTS ABOUT MUSCLES & MOVES
This exercise also works the muscles of the arm, not only to stabilize the wrist and elbow but to push the arm out in front of the body while stabilizing against the pull of the band.
UNDERSTANDING WHY A STRONG CORE IS SO IMPORTANT
There are so many benefits of learning to train the core muscles effectively and safely - not only will your midsection look better, but having a nice strong core can improve your walking, running, posture, ability to lift and carry heavier loads, and it can help prevent back pain. How about a stick - if the stick was flimsy and you tied a rock to one end, the stick would just bend. If the stick was stronger it would not bend and the rock would stay up. If you were to take the stick and bend it over and over at one spot - eventually it would crack and break. Imagine being on ice and trying to push a box away, you would move back and it would not budge. But if you were standing on a stable surface like the ground then the box would move. Or the classic example is - a weak core is like trying to shoot a cannon from a canoe. If your arms have a stable base to work off of they are essentially stronger. Think of trying to push a marble with a string- you can't, it just folds up, but you can push a marble with a pencil.
The rock could be your arm, or something you are trying to lift - like trying to catch a big fish with a flimsy fishing pole - the pole would just bend down, so it would be really hard to get the fish out of the water, but if the pole was strong, it would be easy. Same with the marble - it can be anything - imagine pushing a hose, it just bends. But you can push a stick. There are a lot of examples - jumping off of sand vs jumping off of solid ground. The idea is that if you don't have a solid base to work off of then you will not be as strong in your movements/actions. This is true for your arms and legs as well. Imagine trying to walk with really wiggly knees, or trying to write if you don't have control over your shoulder or elbow - they are not stable, or your bone is broken in half - you have no control. I think the message is less about the spine/object relationship and more about a controlled, stable foundation in order to support controlled movement. A bone is another good example - what would happen if you tried to walk on a bone that was broken in half - your leg would just collapse. The muscles support the joints and give them stability - if you were to remove your leg muscles the knee joint would just collapse under your weight, you would not even be able to stand up. The spine is made up of 24 vertebrae, each with 4 joints and muscles that run up and down (multifidi) that compress the vertebra to hold them together - if they are not doing their job the spine just collapses - you would not even be able to stand. This is easy to see in quadriplegics - they don't have muscle tone in their core muscles so they need to be strapped to their wheelchair or they would just fall out.
The oblique muscles run around the sides of the body, from the ribs to the pelvis. There are two layers of muscles, the outermost layer is the external obliques and the layer beneath it is the internal obliques. The two layers run diagonally in opposite directions. The function of the obliques (internal and external obliques) is rotation of the torso, compression of the abdomen (like a corset), flexion (forward bending) and lateral flexion (side bending) of the torso. They also can help in moving the pelvis and ribs.
The quadratus lumborum muscles are on either side of the back. They run from the ribs to the pelvis. The quadratus lumborum and obliques work together with the other muscles of the trunk - transverse abdominis, erector spinae, multifidi, latissimus dorsi,iliopsoas, rectus abdominis, pelvic floor and diaphragm to maintain upright posture and a stable base for the arms and legs to work off of. The function of the quadratus lumborum is side bending (lateral flexion) of the spine. These muscles also work to stabilize the torso against the same forces (flexion, lateral flexion, rotation).
Upright posture and spinal stabilization (good core strength) are needed to prevent injury to the joints of the spine; this is especially important during dynamic (moving) activities that require rotational movements of the trunk with weighted arm movements - shoveling - dirt and snow, vacuuming, mopping, and overhead reaching and pulling.
As a society, we have moved towards a lifestyle that is less physically demanding than that of our ancestors. We do not squat, climb, pull, and push as much. Many people cannot squat all the way down and hold the position - this is a position that people used for going to the bathroom, eating, and even resting. This has led to an decrease in the mobility of our hips and an increase in core weakness. The result is very tight hip joints and weak cores. Just like most things, the body will always take the path of least resistance . So if someone is tight in their hips and weak in their core and they need to bend over - the movement is going to come from their spine - not their hips. Over time, the legs get weaker, and the spine becomes more flexible - too flexible; When the spine bends forward - it is not using muscles, gravity is just pulling it down, so it does not get stronger. This is exactly the opposite of how the body is designed to work - the legs should be strong and move a lot, and the spine should be stable and strong.
In an exercise world - if you are going to lift weights you need to start by improving your core strength.
When you are just standing still with a neutral spine, the muscles are the least active. The way the curves of the spine are designed - when upright their shape along with the ligaments and the compressive forces of the muscles, hold the body upright.
As soon as you lean forward, and tipped the balance, gravity begins pulling down. If your arms are holding something and outstretched the downward pull of gravity is even greater - not only do the core muscles need to hold the spine up but also the object.
Here is an example that demonstrates this:
If you bend over about 40 degrees from the horizontal with arms stretched out about 18 inches from your center of gravity and lift a 30 pound object - your muscles need to support the weight of your upper body and the object.
From the equation Torque = force x distance:
The torque on the spine from the object = 30 lbs x 18 inches = 540 lbs in-lbs
And the torque from the upper body = 60 lbs ( the torso of a 120 pound person) x 10 inches (assuming the top of the head is 10 inches from the center of gravity of the body) = 600 pounds.
So the core muscles would need to be able to produce 1, 140 pounds of force per inch to lift that object without injury.
Here's a little additional back and forth convo between Carol the Physical Therapist & myself:
Carol: because of the structure of the spine flexion & rotation of the spine under load at the same time is a very vulnerable position. It is the most common mechanism of injury for disc injuries - the disc is put in a position where the tissue is stretched and compressed - so bending flexing) over lifting and turning (rotating) is the cause for most disc herniations/ruptures.
Learning to lift correctly - keeping the spine in neutral and lifting using the legs will prevent injuries. Exercises like the Pallof press teach the muscles to stabilize the spine in a neutral position as you move the arms. These exercises are more about learning how to move than building brute strength. You are teaching the muscles to hold the spine in neutral when you use a lot of force through the arms. And teaching yourself proper body mechanics - moving the arms and not the spine.
Rayzel: got it- okay so do I understand this right, that ideally we should be lifting and turning from the hips, and the torso goes with the hips, so that the spine stays in a neutral position, and that this exercise doesn't necessarily train that movement pattern of learning to rotate from the hips like the woodchops with rotation would, but you are just making a statement about a common way we injure our spines, and that this particular movement, resisting rotation, strengthening those muscles that resist rotation, this puts our body in a better state to be able to not injure our spines in the various activities we do since our muscles will be more capable of resisting rotation or preventing too much rotation in various situations - is that right? sorry I just want to make sure I'm getting the concept.
Carol: Exactly! Strengthening the muscles that resist rotation and teaching the body to resist rotation. A lot of this is a "relearning", or in the PT world -muscle re-education - a mind-body thing. Learning to move through the large ball and socket joints while stabilizing the torso. This will be a much more safe, efficient, controlled, balanced, and powerful movement. Teaching exercise is really about teaching people how to move.
ALLLL MUSCLES & WHEN
ALL MUSCLES WORKING & WHEN DURING THE Lunge Pallof Press
Initially, the upper arms are by the sides and the elbows are bent. The band is under tension which is pulling the body to the side. The quadratus lumborum and obliques would be active to resist the force pulling the spine into a laterally flexed position (side bending towards the band).
The hands are pushed forwards (shoulders flex and elbows extend) - this is carried out by concentric activity of the anterior deltoid, biceps to flex the shoulder, and the triceps to extend the elbow.
Step back to lunge- The quadriceps work eccentrically with the gluteus maximus, hamstring and calf muscles as the hip and knee flex and the ankle moves into dorsiflexion to lunge downward. If a heavy resistance band is used the iliopsoas and rectus femoris (hip flexors) of the front leg can work concentrically (actively bend the hip). The leg muscles also work to hold the position during arm movement.
In the lunge position: As the hands push out to the front the length of the lever arm increases. The shoulder furthest from the band anchor needs to work to prevent being pulled across and up diagonally (flexion horizontal adduction) - the posterior deltoid, teres major, teres minor, infraspinatus, lats, triceps will work isometrically to hold the arm in place; the pec major, lats, mid traps and rhomboids will become more active to hold the shoulder blade back (retraction and depressed). The shoulder closest to the band anchor needs to work to prevent being pulled up and out to the side (flexion and horizontal abduction) - the pectoralis major, minor, coracobrachialis, lats, triceps muscles work isometrically to hold the arm in place.
All of the core stabilizers will be working, at some level, to hold the position: transverse abdominis, erector spinae, rectus abdominis, multifidi, iliopsoas, latissimus dorsi. The more resistance used (further from band or heavier band) the more muscles will be recruited. The rectus abdominis, transverse abdominis, obliques and quadratus lumborum will be more active to hold against the upward diagonal force (extension, side bending and rotation forces).
The quadriceps, gluteus maximus, hamstring and calf muscles contract concentrically to push the body back into an upright. The gluteus maximus and hamstrings will contract at the top of the movement to pull the hip back into a neutral position.
PIN IT FOR LATER!


