Half Kneeling & Kneeling Lifts - Band
How to Do the Resistance Band Beginner Kneeling Lifts - Oblique Toning Exercise | In-Depth Guide [VISUAL LEARNERS] Beginner
Proper Form, Common Mistakes, & Variations | Home Resistance Training


WHAT DO YOU WANT TO SEE?
QUICK DEMO
QUICK DEMO
MUSCLES THIS WORKS
MUSCLES
MAIN MUSCLES WORKED IN the Half Kneeling & Kneeling Lift - Band
Obliques, Quadratus Lumborum, & Transverse Abdominis
OTHER MUSCLES WORKED:
- Multifidi
- Rectus abdominis
- Erector spinae
STARTING POINTERS
Starting Pointers
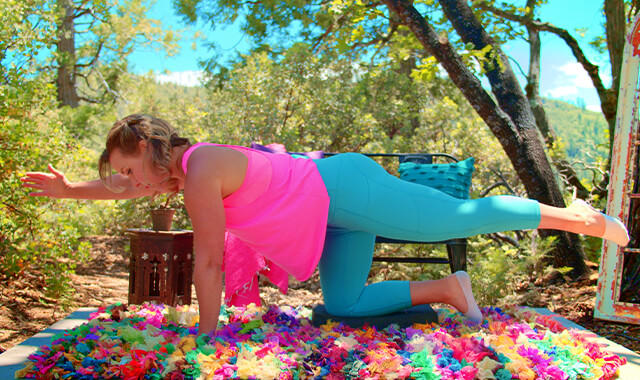
WHAT WE'RE DOING TODAY
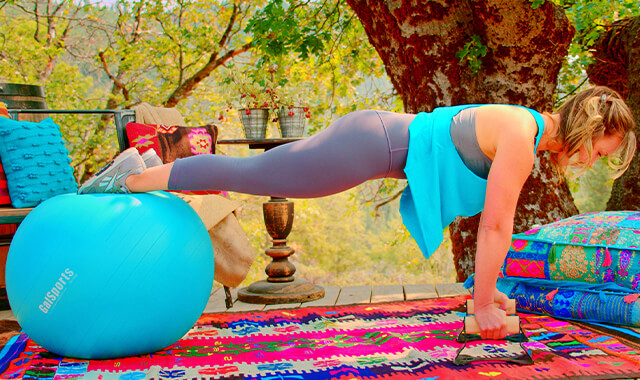
The Kneeling Band Lifts Anti-Rotation Core Exercise is an effective and challenging movement that targets the core muscles, particularly the obliques and deep stabilizers. This exercise is a great way to enhance core strength, stability, and rotational control.
This version of the Lift is done in a kneeling position. This may be easier or harder for you, it depends on your personal weaknesses and strengths. If you rely on your legs to stabilize your torso, the kneeling position will be harder because you will need to use your core muscles more. If you have well-trained core muscles and your legs are weaker - then this may be easier for you. To get the most benefits from your exercises, choose a position that is doable but challenging. This is also an option if you have a shorter band and a low anchor.
HOW TO DO THE EXERCISE
LOOKS
HOW Half Kneeling & Kneeling Lifts SHAPE OUR BODY
Firm, toned midsection, flat abdomen and smaller waist.
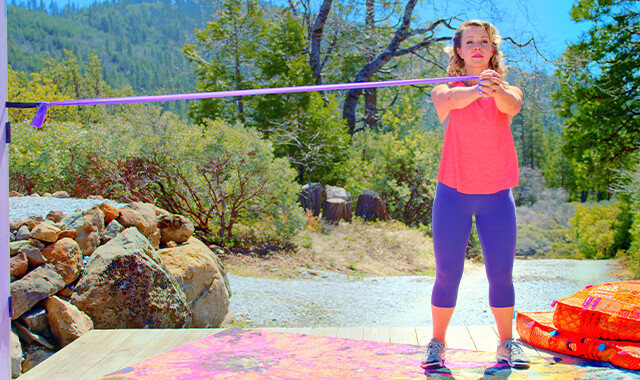
PROPER FORM
PROPER FORM: Half Kneeling & Kneeling Lifts - Band
EQUIPMENT, SETS & REPS
EQUIPMENT
Main set (3: Light/Med/Heavy)
X-Heavy Band (I recommend getting this too if you plan to use resistance bands frequently).
Optional pad to kneel on.
SUGGESTED STARTING WEIGHT FOR WOMEN:
Light to Moderate resistance. Enough to feel the core working, but you are able to pull the band through the whole range of motion.
SETS & REPS:
10 sets of 15 reps on each side.
PACE:
Controlled movement.
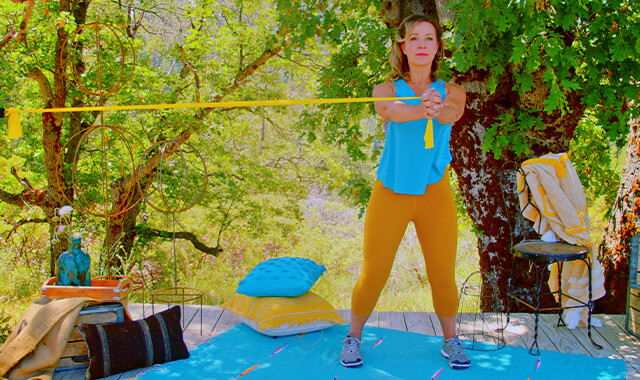
BODY POSITION
BODY POSITION FOR THE Half Kneeling & Kneeling Lift - Band
BAND: Attached to an anchor that is below the level of your hips when you are kneeling.
BODY STANCE: Kneeling on both knees, sideways to the band anchor. You should be able to draw a straight line down from your earlobe, shoulder, torso, hip, and knees. Line up with the anchor so you can grab the band with your arm furthest away from the anchor and pull it up across your body. From the front, you should be able to draw a line down the middle of your torso. At your hips, the weight should be evenly distributed across your pelvis and down from each hip to each knee. Neutral spine (includes neck), sternum lifted, shoulder blades in and down the back, space between the top of your shoulders and your ear lobe, chest wide.
ARMS: Working arm: the arm furthest from the anchor - across your chest (adduction) and down by your opposite hip with your upper arm rotated in (internal rotation) - your thumb is closest to your hip. Elbow fairly straight (a little bend is fine) throughout the exercise. Your non-working arm can be relaxed by your side or your hand can be on the top of your pelvis to check for movement.
HAND/GRIP: Pronated grip on the band - palm facing down, wrist straight. Can wrap the band to help support your wrist.
HOW TO DO
HOW TO DO Half Kneeling & Kneeling Lifts - Band
CUE: Focus on using your abdominal muscles keeping your shoulders and hips squared to the front of you and in one plane. All of the movement is coming from your arm.
TIP: Don’t use such a strong band that you feel it more in you arm than your core.
Pull the band up and across your body diagonally, and lift your hand up and out to the side.
At the top of the movement your arm is rotated so that the underside of your arm is facing forwards or up (external rotation), your arm is raised (flexion) and angled out to the side (abduction). Like a one-arm “tada” gesture.
The movement should be controlled and the focus is on keeping your torso still.
Reverse the movement to return to the starting position.
Begin the next rep.
Per Carol: Toes up is fine. I don't like to cue to squeeze your glutes because so many people have a hard time relaxing them. I find it works better to talk about keeping the front of the hip flat and the body very still - they may need to engage the glute max to do that, especially if their band is strong, then that is fine - but most likely they will tighten at the end range of the arm movement and then let up as the arm comes down. I think cueing them to squeeze the glutes kind of interferes with training muscles to respond to instability - the timing of different muscles firing in response to the changes in force and direction of the resistance - does that make sense?
HOW TO SAFELY GET OUT OF THE EXERCISE
From the beginning position, release the band.


COMMON MISTAKES
COMMON MISTAKES
WHAT TO AVOID WITH THE Half Kneeling & Kneeling Lift - Band
KEY TIP:
Guess what? Good news! Many avoids are the same for most movements. Once you learn the basics, there's really only a few extra avoids for each individual movement.
1. Avoid Spine Rotation
AVOID: Letting your spine rotate with the arm.
WHY NOT?
- Repetitive spinal rotation under load (resistance of band) can cause soft tissue/joint irritation or damage over time.
WHAT TO DO:
- Your chest should be squared to the front, with no rounding or rotation of the upper back.
- The shoulder blades do rotate during the movement but the thoracic spine and ribcage do not.
- The hips stay squared to the front.

2. Avoid Shoulder Riding Up
AVOID: Letting the shoulder of the working arm rise up towards the ear (no shoulder shrugging).
WHY NOT?
- This will decrease the activation of the postural muscles (mid and lower back, and core).

3. Avoid Shifting Weight to One Side
AVOID: Shifting your weight as the arm moves diagonally across the body.
WHY NOT?
- This will decrease muscle activity.
WHAT TO DO:
- Keep equal weight bearing on the left and right sides throughout the movement of the arms.

4. Avoid Knee Caving In/Out
AVOID: Letting the knee of the front leg move.
WHY NOT?
- Letting the knee move in and out can strain the ligaments on the side of the knee.
WHAT TO DO:
- Keep the lower leg vertical and still.

5. Avoid Side Of Hip Sagging Out
AVOID: Letting the pelvis drop or the hip sag out.
WHY NOT?
- The hip can drop or sag out to the side when the gluteus medius (on the side of the hip) is not properly engaged.
WHAT TO DO:
- Keep your torso stacked over your hips.
- Positioning yourself in front of a mirror can help to identify the problem and correct the form.

6. Avoid Too Much Elbow Bend
AVOID: Bending your elbow arm so much that it is too close to your body when you get to your midline during the movement.
WHY NOT?
- This will decrease the amount of resistance from the band and the core muscles will not need to work as hard.
WHAT TO DO:
- The arm should be near straight/slightly bent so that the arms are a fair distance away from your torso for most of the movement.

7. Avoid Band Pulling Body Forward
AVOID: Letting your spine get pulled forward at the top of the movement.
WHAT TO DO:
- While the arms /forward up, the spine remains neutral, in line with your lower half.
- The torso does not move forward.

8. Avoid Bending Wrists
AVOID: Moving through the wrists.
WHY NOT?
- This can lead to tissue/joint irritation or damage over time.
WHAT TO DO:
- Keep the wrist in alignment with the forearm.

VARIATIONS
VARIATIONS
VARIATIONS OF Half Kneeling & Kneeling Lifts - Band
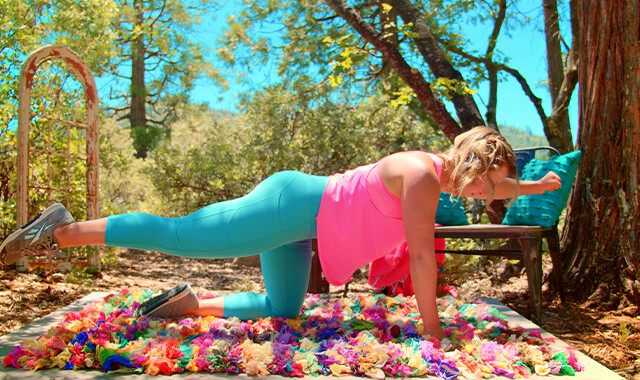
Half Kneeling Lifts
Half Kneeling Lifts
This is another good option if your band is short and your anchor is low. Depending on your personal strengths and weaknesses, this position may feel more or less stable than the tall kneeling position. One leg in front - hip and knee bent - the shin perpendicular to the floor and the thigh parallel to the floor, the foot flat on the floor. The other leg behind, hip in neutral - no crease, knee bent with the lower leg resting on the floor. The leg that is in front will be furthest from the band anchor. The hips should be over the knee of the back leg. Set up: You should be able to draw a straight line down from your hip to the knee that is resting on the floor. The torso stacked over your hips. The leg that is in front of you, foot on the floor, should be aligned - hip in line with kneecap in line with shin and ankle. The working arm is the arm that is opposite the band anchor.

WHAT WE'RE DOING TODAY
WHAT & WHY
BENEFITS OF TRAINING THE core Muscles
WHAT
OUR CORE NEEDS TO RESIST ROTATION
The lifts exercise is all about strengthening our core to resist rotation when moving our arms. Standing Band Lifts are used to train the core muscles to keep the spine in neutral and stabilize the torso as the arms move. This movement is commonly done with the Woodchopper exercise as a set. The Woodchopper works the core muscles as the arm moves down diagonally across the body, and Band Lifts work the core muscles as the arm moves up diagonally across the body.
As a beginner, you can start with a lighter resistance band and gradually increasing the intensity as you become more comfortable with the exercise.
3 PLANES OF MOTION!
Lifts are movement patterns that involve moving the arms in three different ways (three planes of motion). The pattern includes rotation, forward/backward, and movement to the sides of the body. This is GREAT because, in everyday life, we move in all sorts of ways to do the various stuff we do.
The movements all happen simultaneously as you move in a diagonal path, when you start the movement the arm is internally rotated, adducted, and extended (app. 0 degrees of flexion), as soon as the arm moves it begins to flex, abduct, and externally rotate and continues throughout the movement until it ends up at the top - flexed, abducted and externally rotated. It is a combined movement - all three movements at once.
The arm begins down across your chest and rotated in, then it is lifted up and out to the side as it rotates out. The movement trains the core muscles to prevent rotation and side bending during these arm movements. The movement patterns can be challenging to coordinate at first. This is part of the exercise, learning to control the movement of the arm while you hold your core still.
A DIAGONAL MOVEMENT PATTERN LIKE A “TA-DA!”
Lifts begin with the arm across the chest and by the opposite hip. The arm is lifted up and out to the other side. As if you were doing a tada! gesture with one arm. Another analogy used to describe the movement is reaching into the opposite pocket and lifting out a sword, then holding the sword up high.
WHY BOTHER DOING IT?
WHY
WHY DO WE EVEN CARE?
IMPROVE OUR CORE’S ABILITY TO WORK LONG & WELL
The main function of the spine is to keep us upright and to provide a stable base of support for the arms and legs to work off of. Lifts are a great exercise for improving the performance (that is how WELL our core muscles do their job) and endurance (that is how LONG it can do that job well) of the muscles of the core. The exercise targets the obliques, quadratus lumborum, and transverse abdominis muscles, training them to stabilize the core while you move the arms.
HELP PREVENT BACK PAIN & INJURIES
Many back injuries happen with rotation and bending of the spine. Training the obliques, which prevent the spine from rotating, and the quadratus lumborum, which prevents the spine from side bending, along with the other core muscles to keep the spine in good alignment during lifting and moving the arms can help to prevent these injuries.
Take the example of shoveling snow - you are side-bent and rotated in one direction as you are lifting a heavy load up and across your body. This would be an example where using Lifts to strengthen the core muscles could help to prevent a back injury. But how does doing an ANTI-rotation exercise help you do an activity that involves rotation?
- Because you are training the same muscles, and training them to support the joints to prevent excess motion.
- You are also working on getting movement at the hip and shoulder joints as opposed to the spine. The goal is to strengthen the muscles around the spine so that there is no excessive movement in the spine - it is training you to keep your spine relatively quiet as you get most of the movement and strength from the hips and the arms.
- When muscles are functioning properly they support the joints by controlling movement and by absorbing shock - decreasing stresses on the passive stabilizers (ligaments, discs) and the joint surfaces. A good example of this is jumping. If you relax your muscles when you land, the femur and tibia slam together, the stronger your leg muscles are the more they are able to absorb the impact to protect the joint.
So basically you are training your body to move in the safest way, knowing that in everyday life you will be getting more movement in your spine, but strengthening all of the supporting muscles and improving the range of motion of the limbs to try to minimize the movement in the spine. Many out-of-shape people get a sore back from shoveling snow (or a true injury), but if they had proper body mechanics and good core strength they could shovel a lot longer.
REINFORCE HEALTHY MOVEMENT PATTERNS BETWEEN THE BRAIN & MUSCLES
Most of us have not been taught how to properly move our bodies in the way they are naturally designed to work in order to keep them healthy - with the least amount of wear and tear and to help to prevent injury.
By doing exercises like Lifts that move the arm through a pattern over and over, you are reinforcing the communication between the brain and the muscles to create & make a healthy movement pattern HABIT - the arm is in constant motion and the core muscles need to make constant adjustments to hold the spine in good alignment. The brain is also working to keep the body balanced. This is a very effective way to train the core muscles because this is what they need to do all day long to keep us upright, no matter what we are doing with our arms.. The muscles need to be working in coordination, making continuous changes in how much force they are producing in order to control the movement of the spine. Whenever we move our arms or legs the core muscles need to work together to keep us balanced and to protect the spine from injury.
CREATE BALANCED STRENGTH BETWEEN THE CORE, ARMS & LEGS
When the core muscles are not properly trained, the spine can move too much during lifting heavy objects and/or twist our bodies quickly or repetitively. This can result in injury or more commonly, small amounts of damage over time. As an example, before core exercises were in my life much at all, even something seemingly simple like doing a bent-over row, I would find as I lifted the dumbbell, it felt like my spine wanted to twist & bend & that I couldn’t get a good weight to challenge my actual muscles while keeping my spine in a healthy position- this means then that you either 1. End up tweaking your back in order to lift a weight heavy enough to fatigue the muscles (lats in this case) you are trying to work; or 2. You use a lightweight that doesn’t cause your spine to move but also, it doesn’t really challenge your muscles - they don’t get tired and they won’t get stronger. This also translates into everyday life where you aren’t able to do anything that involves an item that weighs too much or you’ll hurt your back because you don’t have the training & strength in the core to prevent it from doing weird stuff like twisting.
Once core work became a part of all my workouts, I now feel super stable & strong in my core & I can lift an appropriate weight for the muscles I’m trying to work, without feeling like my core/spine is going to move & get hurt.
Training your body to stabilize your spine while you use your arms will help to prevent damage to the spine and keep your spine healthy.
This exercise will also work the muscles of the arm, not only to stabilize the wrist and elbow but to pull the arm up diagonally and across the body - for a combination of abduction, flexion, and external rotation.
EVERYDAY LIFE
EVERYDAY LIFE &
MUSCLE FUNCTION
HOW WE USE OUR core MUSCLES IN EVERYDAY LIFE
1. INTERNAL AND EXTERNAL OBLIQUES
- Rotation of the torso - both to achieve rotation and to resist rotation
- Compression of the abdomen (pulling the belly button in towards the spine)
- Flexion of the spine (forward bending) and lateral flexion (side bending) of the torso
- Also can help in moving the pelvis and ribs
2. QUADRATUS LUMBORUM
- Side bending (lateral flexion) of the spine
3. THE OBLIQUES, QUADRATUS LUMBORUM, AND TRANSVERSE ABDOMINIS WORK TOGETHER TO
- Maintain an upright posture and spinal stabilization (good core strength)
-
- Prevents injury to the joints of the spine; this is especially the case when lifting and moving heavy objects
- Rotation and side-bending - to prevent these motions during higher forces to protect the spine
-
- Golf
- Tennis
- Lifting dishes out of a dishwasher
- Pulling clothes out of the dryer
- Shoveling
HOW TO FEEL WHAT MUSCLE IS WORKING
How to Feel What Muscle is Working
Quadratus Lumborum: Put your hands on your low back, on either side of your spine. If you are sitting, lift one Sitz bone up without leaning or shifting your weight. You should be able to feel the quadratus lumborum activate under your hand on the side that you are lifting.
Obliques: This muscle can be harder to feel since it is deeper. Put your hand on the front of your torso, off to one side, between your ribs and your pelvis. Pull the ribs down toward the opposite side. You should be able to feel the muscle under your hands. You will only be able to feel the external obliques. The internal obliques lie under the external obliques.
Transverse abdominis: This is a challenging muscle to feel with your hand. It is an important muscle to gain control over. Lying on your back with knees bent, slip your hand under your low back. Imagine someone dropping a small soft ball on your stomach. You should be able to pull your belly button in to engage the muscles of the abdomen gently without changing the position of your low back.
SCIENCY STUFF
SCIENCY STUFF
SPIFFILICIOUS FACTS ABOUT MUSCLES & MOVES
Lifts are diagonal movement patterns called PNF - proprioceptive neuromuscular facilitation. The pattern is thought to reinforce the connection between the brain and the muscles. They are unique in that they incorporate diagonal muscle patterns to help correct muscle imbalances that affect posture. This is a good way to train the brain-body connection with movement patterns that are used in everyday life.
ALLLL MUSCLES & WHEN
ALL MUSCLES WORKING & WHEN DURING THE Half Kneeling & Kneeling Lift - Band
The core stabilizers (obliques, transverse abdominis, quadratus lumborum, rectus abdominis, erector spinae, multifidi) work to hold the spine in a neutral position throughout the exercise. The scapular muscles will work to move and stabilize the shoulder blade throughout the movement. The rotator cuff muscles will work to stabilize the head of the humerus (upper arm bone) in the center of the socket.
The triceps contract isometrically to the elbow still. The muscles of the forearm hold the wrist still. The biceps, deltoids contract concentrically to lift the arm up and out to the side. The teres minor and infraspinatus rotate the arm from internal rotation to external rotation.
The obliques will work to hold the torso still against the rotational force when the arm begins to pull the band up- the resistance of the band will attempt to pull the side of the torso (same side as working arm) forwards and the opposite side backwards.
If the right arm is being used then the right side of the torso will be pulled into rotation to the left. The left external obliques and the right internal obliques would need to prevent the movement. As the arm is pulled up and across, the opposite muscle activity would be needed to prevent right rotation of the torso. This description is very simplified - the internal and external layers run in opposite directions. When they are stabilizing the core the activation of the muscles will be changing with the amount of force and the direction of force as the arm pulls up and across. There is most likely activity which is occurring in the opposing muscles (meaning when the left external and right internal obliques are working to prevent left rotation, most likely there is eccentric or isometric activity of the right internal and external obliques), but I was unable to find any data on this.
The obliques and transverse abdominis will be working for general spinal stabilization: the obliques are broad flat muscles that wrap around the sides of the torso, when they contract they pull inwards to stabilize the mid section.
In the beginning of the movement the right quadratus lumborum will contract to prevent left side bending (right arm is working arm), but as the pulls up and across the left side will contract to prevent right side bending (this is also dependent on strength of band and technique of exerciser - this is assuming they are trying to side bend right to help pull the band up using their torso; if the band is pulling them into left sidebending then the right side would contract).
At the end of the movement the resistance will be the greatest, most of the core muscles (multifidi, quadratus lumborum, obliques, transverse abdominis, iliopsoas, serratus posterior, lats) will be working against the rotational force to stabilize the core.
The muscles of the upper body will work eccentrically along with the same core muscles to stabilize the core and control the movement of the arm as it returns to the starting position.
PIN IT FOR LATER!


