Mini Band Glute Bridge
How to Do the Floor Glute Bridge Variation with Mini Band Under Hands at Home | In-Depth Guide [VISUAL LEARNERS] Beginner
Proper Form & Common Mistakes | Home Resistance Training
WHAT DO YOU WANT TO SEE?
QUICK DEMO
QUICK DEMO
MUSCLES THIS WORKS
MUSCLES
MAIN MUSCLES WORKED IN the Mini Band Glute Bridge
GLUTEUS MAXIMUS & HAMSTRINGS
OTHER MUSCLES WORKED:
- Adductor Magnus
- Gluteus Minimus
- Core (erector spinae, transverse abdominis). The transverse abdominis is under the obliques and is like a big muscle corset. When it contracts it pulls inward - just like lacing up a corset or a back brace. It is the muscle that is absolutely key to being able to activate for core stabilization. It works very closely with the obliques. The obliques main function is to rotate the spine and stabilize against rotational forces on the spine.
STARTING POINTERS
Starting Pointers
WHAT WE'RE DOING TODAY
Other names for this exercise: Resisted Glute Bridge
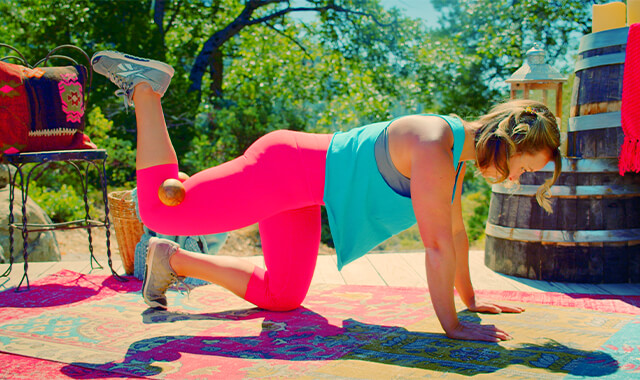
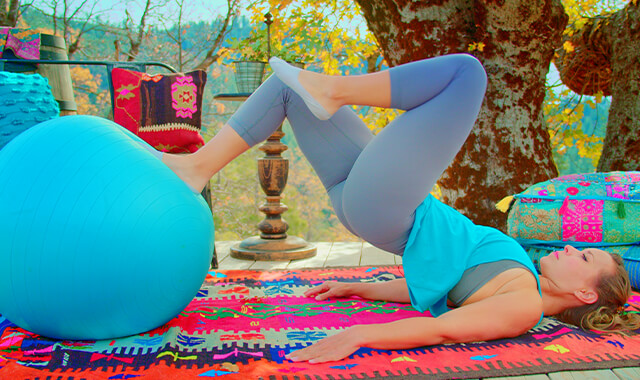
This floor hip bridge is a glute activation exercise that uses a mini band to add resistance. Your gluteus maximus muscles will need to work harder to push up against the resistance of the band. This also has the added bonus of working the triceps to anchor the band. This glute bridge variation is an excellent way to strengthen your glutes, improve hip stability, and enhance overall body strength.
The mini band is looped around your hip joints, your hands will be holding the bottom part of the band held down to the floor. The resistance from the band will continue to increase the higher you press the pelvis up. The gluteus maximus muscle is most active at the top of the movement, where the band is providing the most resistance.
HOW TO DO THE EXERCISE
LOOKS
HOW Mini Band Glute Bridge SHAPE OUR BODY
Rounded, firm and lifted buttocks.
PROPER FORM
PROPER FORM: Mini Band Glute Bridge
EQUIPMENT, SETS & REPS
EQUIPMENT
Mini Band
The standard mini-bands are about a 12" loop- which is actually too big for a lot of exercises to be effective (I mean, they'll do, but if you can....)
These are better & you'll be less annoyed:
10" loop mini-bands
9" loop mini-bands
9" loop mini-bands
If you buy 1 set, get the 9" size. I honestly recommend getting both. They're affordable & give you a lot of versatility to find the right stretch & resistance for a variety of exercises.
If these aren't currently for sale, you will need to search specifically for 9-inch or 10-inch mini bands. If you just search mini bands all you'll ever see are the 12" ones.
Washcloth to support the neck if needed.
SUGGESTED STARTING WEIGHT FOR WOMEN:
Moderate resistance
SETS & REPS:
2 sets of 8-10 reps
PACE:
Quick up and slow down – must be able to hold pelvis and spine in neutral.
BODY POSITION
BODY POSITION FOR THE Mini Band Glute Bridge
Lie face up on the floor. Loop the mini band around your hips.
BODY STANCE: Spine in neutral. Backs of shoulders on the floor, chest open.
FEET: Approximately hip-width apart. Flat on the floor, sliding your feet in towards your bottom as far as you can without causing any discomfort in your knees or thighs.
ARMS: Straight by sides with hands anchoring the bottom part of the mini band to the floor - palms down.
HOW TO DO
HOW TO DO Mini Band Glute Bridge
CUE: Concentrate on your gluteus maximus doing most of the work. Slowly control your lower back towards the floor against the pull of the band - this is just as important as pressing up.
Holding your arms down to anchor the band, press your pelvis up.
Keep your pelvis level and your spine in neutral throughout the movement.
Continue to push your pelvis up by straightening the front of your hips. Try to lift up high enough to form a straight line between your shoulders and knees. Keep your core muscles engaged to hold your spine and pelvis level and in neutral. You can push up into more hip extension as long as you don’t arch your low back.
Pause briefly at the top, then lower down to just hover over the floor.
Push up for the next rep.
HOW TO SAFELY GET OUT OF THE EXERCISE
With your pelvis on the floor, release and remove the band. Roll over to your stomach and use your hands to push up to kneeling, then push up through your legs to stand.


COMMON MISTAKES
COMMON MISTAKES
WHAT TO AVOID WITH THE Mini Band Glute Bridge
KEY TIP:
Guess what? Good news! Many avoids are the same for most movements. Once you learn the basics, there's really only a few extra avoids for each individual movement.
1. Avoid Posterior Pelvic Tilt
AVOID: Avoid tilting your pelvis.
WHY NOT:
- Moving through the low back and pelvis can irritate the joints of the spine and sacrum.
- Moving through the low back and pelvis will not train the gluteus maximus to extend the hips while keeping the pelvis and low back in neutral.
WHAT TO DO:
- The low back and pelvis should not move during the bridge.
- The movement should be isolated to the hips - moving from being bent to being straight.
- This exercise is targeting the muscles of the hip during movement of the hip while stabilizing the spine.

2. Avoid Hamstring Pain
AVOID: Avoid using the hamstrings without the gluteus maximus.
WHY NOT?
- If your hamstrings cramp it means that your hamstrings are trying to take over the job of the glutes.
WHAT TO DO:
- Make sure that you are pushing down into your feet
- As you push down the crease at the front of the hip should flatten as the thigh bone is pushed forward by the gluteus maximus.
- Try putting your hands on the lower buttocks to feel the gluteus maximus working.
3. Avoid Feet Too Close To Bottom
AVOID: Avoid bringing the feet too close to your bottom.
WHY NOT?
- Bending the knees too far can strain the knee joint (between the kneecap and the thigh bone).
- This puts too much strain on the joint between the kneecap and the femur (patellofemoral joint) and may lead to degenerative changes over time.
WHAT TO DO:
- It is true that bringing the feet in closer to the bottom will work the gluteus maximus more and the hamstrings less, but avoid bending your knees too much) that it causes discomfort on the front of the knee.

4. Avoid Misalignment of Legs
AVOID: Avoid letting your knee or ankle roll in or out.
WHAT TO DO:
- Make sure you have good alignment of your upper leg, knee, lower leg, ankle and foot.
- You should not be rolling your knees or ankles inward or outward. Poor alignment will put a strain on the ligaments of the joints.
- It will also lessen the effect of the exercise by missing the opportunity to train the stabilizing muscles.
- Maintain good alignment: center of hip joint-a line down the thigh bone- center of kneecap-a line down the lower leg-center of ankle - foot flat on the floor.

5. Avoid dropping down & straining Neck
AVOID: Avoid dropping back down to the ground.
WHAT TO DO:
- Both the lift (concentric) and the lowering (eccentric) are important parts of the exercise.
- Dropping down instead of lowering down to the floor will only be working the muscles concentrically.
WHAT WE'RE DOING TODAY
WHAT & WHY
BENEFITS OF TRAINING THE Glutes
WHAT
Glute Bridges are done lying on the floor with the knees and hips bent. The gluteus maximus, the largest buttocks muscle, is used to lift the pelvis off of the floor by straightening the hips. The active movement should happen at the hips - beginning in a position where the hips are bent - you can see and feel at the front of the hip joint. When the gluteus maximus muscle is activated, it works to straighten the hips (hip extension) - the front of the hips flatten and there is no crease.
It is important to focus on using the gluteus maximus muscle to lift the pelvis instead of using the muscles on the front of the thighs (quadriceps) to straighten the knees. This may be a challenge if you are someone that has really strong muscles on the front of the thighs and weaker ones on the back. This can happen if you do a lot of exercises that focus on the quadriceps, like squats and lunges with poor form. Squats and lunges will get the gluteus maximus muscle when you make sure to straighten the hip out at the top of the movement. It is also important to include exercises that target the hamstrings and gluteus maximus, like bridges, and hamstring curls, to keep the muscles on the front and back of the legs balanced.
Bridges have the added benefit of working the core muscles. When the trunk lifts off of the floor, the core muscles work to hold the spine still and in a neutral position.
WHY BOTHER DOING IT?
WHY
WHY DO WE EVEN CARE?
Healthy and strong gluteus muscles are important for injury prevention of the back, hip, and knee, normal gait patterns, and posture. In the normal gait pattern, the gluteus maximus helps to pull the leg behind the body so the foot can push off and propel the body forward. As people age, we tend to start taking shorter steps. The reason is different for different people - but the bottom line is that there is a tendency towards less push-off from the back leg, due to either (or both) the leg not moving back as far or the muscles not pushing off as much. Basically stiffer and weaker hips. And, to make matters worse, one affects the other, leading to a progressive downward spiral. The stiff hip cannot move back as far, so the muscle does not have to push off as hard, the muscle gets weaker and the step gets smaller which causes the hip to get even stiffer… The good news is that exercise can keep your hips moving and your muscles strong, glute bridges are great for this.
Many of us sit for hours of the day, working at desk jobs, driving, sitting to eat, and some of us even sleep with our hips bent. This position keeps the hips bent (flexed) for many hours which can cause the muscles that bend the hips (hip flexors) to get tight. The basic bridge is a good way to counter this because it works on straightening out the front of the hip joint. If your hip flexors are tight you may feel a nice bonus stretch with this movement.
EVERYDAY LIFE
EVERYDAY LIFE &
MUSCLE FUNCTION
HOW WE USE OUR GLUTES & HAMSTRINGS IN EVERYDAY LIFE
1. THE GLUTEUS MAXIMUS AND HAMSTRINGS MOVE THE THIGH BACK FROM A BENT POSITION TO STRAIGHTEN THE HIP (HIP EXTENSION)
- Transitioning from sit to stand
- Standing upright with good posture
- Running uphill
- Jumping
- Standing back up from squatting down
- Lifting items from the floor
2. HELP TO TRANSFER POWER FROM THE LEGS TO THE ARMS
- Batting
- Golfing
- Tennis
- Shoveling
- Vacuuming
- Throwing a ball
So unless you plan on not being alive sometime soon, you need your glute muscles working well!
The glute max is very active even for just standing still! I'm all about standing easier lol.
It is also involved in balance and stability. The gluteus maximus is very active for everyday walking. A normal walking pattern requires the muscles of the leg, hip and core to hold the body stable over one leg at a time, all of the gluteal muscles help with this. Once the other leg is set down on the ground, the gluteus maximus fires to pull the leg back, propelling the body forwards.
Healthy hip extensors help to protect the muscles and joints of the back, hips, knees and ankles.
HOW TO FEEL WHAT MUSCLE IS WORKING
How to Feel What Muscle is Working
The most relevant way to feel the gluteus maximus muscles working is to get into the starting position for the bridge - lying on your back with your hips and knees bent, feet flat on the floor. Place your hands on your lower buttocks. Squeeze the muscles and lift the pelvis off of the floor - just about one inch. Make sure that you feel both sides working. It is fairly common, especially if you have any history of back or hip pain, to have one gluteus maximus that is more active than the other. Try activating one side at a time. Make a mental note if you feel a difference between the two sides. When you are doing the bridges pay close attention to using both sides equally.
SCIENCY STUFF
ALLLL MUSCLES & WHEN
ALL MUSCLES WORKING & WHEN DURING THE Mini Band Glute Bridge
The transverse abdominis, erector spinae are engaged to hold the spine in neutral. The triceps are working isometrically to anchor the band to the floor, they will work harder the higher you lift up.
The gluteus maximus with help from the hamstrings act concentrically to extend the hips from a flexed position (crease at hips) towards neutral (no crease). The gluteus maximus and adductor magnus become more active as the hip moves from flexion into extension and against the increasing resistance from the band. The gluteus maximus is most active from neutral to extension. The core muscles are active throughout the exercise.
The same muscles of the hip work eccentrically to lower the body back towards the floor.
PIN IT FOR LATER!


