Glute Bridge
How to Do the Bodyweight Floor Glute Bridge - Beginner Glute Activation Exercise| In-Depth Guide [VISUAL LEARNERS] Beginner
Proper Form, Common Mistakes, Variations + Easier & Harder | Home Resistance Training

WHAT DO YOU WANT TO SEE?
QUICK DEMO
QUICK DEMO
MUSCLES THIS WORKS
MUSCLES
MAIN MUSCLES WORKED IN the GLUTE BRIDGE
GLUTEUS MAXIMUS & HAMSTRINGS
OTHER MUSCLES WORKED:
- Adductor Magnus
- Gluteus Minimus
- Core (erector spinae, transverse abdominis). The transverse abdominis is under the obliques and is like a big muscle corset. When it contracts it pulls inward - just like lacing up a corset or a back brace. It is the muscle that is absolutely key to being able to activate for core stabilization. It works very closely with the obliques. The obliques main function is to rotate the spine and stabilize against rotational forces on the spine.
WHAT WE'RE DOING TODAY
WHAT & WHY
BENEFITS OF TRAINING YOUR GLUTEUS MAXIMUS & HAMSTRINGS MUSCLES
WHAT
WHAT WE'RE DOING TODAY
Other names for this exercise: Name of Exercise
ALL WE'RE DOING:
Text
Glute Bridges are done lying on the floor with the knees and hips bent. The gluteus maximus, the largest buttocks muscle, is used to lift the pelvis off of the floor by straightening the hips. The active movement should happen at the hips - beginning in a position where the hips are bent - you can see and feel at the front of the hip joint. When the gluteus maximus muscle is activated, it works to straighten the hips (hip extension) - the front of the hips flatten and there is no crease.
It is important to focus on using the gluteus maximus muscle to lift the pelvis instead of using the muscles on the front of the thighs (quadriceps) to straighten the knees. This may be a challenge if you are someone that has really strong muscles on the front of the thighs and weaker ones on the back. This can happen if you do a lot of exercises that focus on the quadriceps, like squats and lunges with poor form. Squats and lunges will get the gluteus maximus muscle when you make sure to straighten the hip out at the top of the movement. It is also important to include exercises that target the hamstrings and gluteus maximus, like bridges, and hamstring curls, to keep the muscles on the front and back of the legs balanced.
Bridges have the added benefit of working the core muscles. When the trunk lifts off of the floor, the core muscles work to hold the spine still and in a neutral position.
WHY BOTHER DOING IT?
WHY
WHY DO WE EVEN CARE?
Healthy and strong gluteus muscles are important for injury prevention of the back, hip, and knee, normal gait patterns, and posture. In the normal gait pattern, the gluteus maximus helps to pull the leg behind the body so the foot can push off and propel the body forward. As people age, we tend to start taking shorter steps. The reason is different for different people - but the bottom line is that there is a tendency towards less push-off from the back leg, due to either (or both) the leg not moving back as far or the muscles not pushing off as much. Basically stiffer and weaker hips. And, to make matters worse, one affects the other, leading to a progressive downward spiral. The stiff hip cannot move back as far, so the muscle does not have to push off as hard, the muscle gets weaker and the step gets smaller which causes the hip to get even stiffer… The good news is that exercise can keep your hips moving and your muscles strong, glute bridges are great for this.
Many of us sit for hours of the day, working at desk jobs, driving, sitting to eat, and some of us even sleep with our hips bent. This position keeps the hips bent (flexed) for many hours which can cause the muscles that bend the hips (hip flexors) to get tight. The basic bridge is a good way to counter this because it works on straightening out the front of the hip joint. If your hip flexors are tight you may feel a nice bonus stretch with this movement.
EVERYDAY LIFE
EVERYDAY LIFE &
MUSCLE FUNCTION
HOW WE USE OUR GLUTE MAX & HAMSTRINGS MUSCLES IN EVERYDAY LIFE
1. THE GLUTEUS MAXIMUS AND HAMSTRINGS MOVE THE THIGH BACK FROM A BENT POSITION TO STRAIGHTEN THE HIP (HIP EXTENSION)
- Transitioning from sit to stand
- Standing upright with good posture
- Running uphill
- Jumping
- Standing back up from squatting down
- Lifting items from the floor
2. HELP TO TRANSFER POWER FROM THE LEGS TO THE ARMS
- Batting
- Golfing
- Tennis
- Shoveling
- Vacuuming
- Throwing a ball
So unless you plan on not being alive sometime soon, you need your glute muscles working well!
The glute max is very active even for just standing still! I'm all about standing easier lol.
It is also involved in balance and stability. The gluteus maximus is very active for everyday walking. A normal walking pattern requires the muscles of the leg, hip and core to hold the body stable over one leg at a time, all of the gluteal muscles help with this. Once the other leg is set down on the ground, the gluteus maximus fires to pull the leg back, propelling the body forwards.
Healthy hip extensors help to protect the muscles and joints of the back, hips, knees and ankles.
STARTING POINTERS
Starting Pointers
The glute bridge is a great exercise for really waking up the largest muscle of your backside.
The position of this particular exercise makes it easy to really focus on contracting your gluteus maximus, which is the large muscle that makes up most of the buttock region.
The interesting thing about bridges is that it is easy to use other muscles (rather than the glutes) to get the same movement. This is true in everyday life also.
It is easy to start to use the muscles of the thighs (quadriceps) or muscles of the back to help move the leg. The result of this is weaker and smaller glutes. The bridge is a really good way to wake up the gluteus maximus and to make sure it does its job.
The glute bridge is done lying down on your back, this eliminates the need to focus on holding your balance or worrying about your posture, you can focus entirely on which muscles are responsible for the movement.
You can even put your hands on your gluteus max muscles to make sure that they are contracting to lift the hips up. The main job of the gluteus maximus muscle is to pull the leg back behind the body.
This is not a large movement but it is a powerful movement. When you bridge up you can see how the crease in the front of the thigh disappears as the leg moves behind the body.
Other muscles may help with this movement, but you should be focusing on contracting the gluteus maximus to push your pelvis up off of the floor. Once this movement has been mastered with correct form, it is very easy to make modifications to the movement to continue to challenge the muscle.
The gluteus maximus is very important for posture, walking, and to help stabilize the pelvis and back.
HOW TO FEEL WHAT MUSCLE IS WORKING
How to Feel What Muscle is Working
The most relevant way to feel the gluteus maximus muscles working is to get into the starting position for the bridge - lying on your back with your hips and knees bent, feet flat on the floor. Place your hands on your lower buttocks. Squeeze the muscles and lift the pelvis off of the floor - just about one inch. Make sure that you feel both sides working. It is fairly common, especially if you have any history of back or hip pain, to have one gluteus maximus that is more active than the other. Try activating one side at a time. Make a mental note if you feel a difference between the two sides. When you are doing the bridges pay close attention to using both sides equally.
HOW TO DO THE EXERCISE
LOOKS
HOW GLUTE BRIDGEs SHAPE OUR BODY
Tones and strengthens the buttocks.
PROPER FORM
PROPER FORM: GLUTE BRIDGE
EQUIPMENT, SETS & REPS
QUIPMENT:
None needed
SUGGESTED STARTING WEIGHT FOR WOMEN:
Bodyweight
SETS & REPS:
2 sets of 8-10 reps (to fatigue)
PACE:
Quick up and slow down – must be able to hold pelvis and spine in neutral. Push hips into extension at top and pause.
BODY POSITION
BODY POSITION FOR THE GLUTE BRIDGE
BODY STANCE: Lying down on the floor – face up(supine), knees bent. The spine is in neutral – you should be able to put a hand under the curve in your low back.
Note: I was taught to flatten my back in this position for movements, so this is the exact opposite of what we’ve been told. Our spine in neutral has a slight curve through the lumbar area- we don’t want to flatten that- that is where your hand should fit.
PELVIS: Neutral – not tilted forward or backward.
FEET PLACEMENT: Hip width apart – feet flat on the floor, toes pointed forward. Feet about 6-8 inches from your bottom - test by putting a hand under your lumbar curve - that curve should not change (no increase in pressure on your hand) when you bend your knees and position your feet.
ARM POSITION: Relaxed by the side – comfortable position.
NECK POSITION: Neutral and relaxed – it may help to push a small towel roll or folded washcloth to support the curve of your neck.
HOW TO DO
HOW TO DO GLUTE BRIDGEs
CUE: Push down through the heels and lift with your glute muscles. You are not moving through your lumbar spine to get to the top position.
Feel the weight distributed across your upper back and shoulders and feet. Your weight should be equally distributed between your left and right foot.
Keep your pelvis level and your spine neutral throughout the movement. Your core muscles should be engaged but not gripping. Take a short breath out and the level of ab engagement there should be about right to keep.
Begin the movement by pushing your pelvis straight up towards the ceiling. Your body should be in a line from shoulders to hips. Focus on pushing up through the hips (extending) – not straightening the knees.
Keep pushing upward until the front of your hips are flat, or even slightly extended if you are able to do so without extending the spine.
A good contraction of the transverse abdominis muscle (front abdominal) will help maintain a neutral spine as you extend the hips. At the end of the movement your shoulders, hips and knees should be in line (hips may be slightly higher but not lower).
Pause at the top with the hips in extension. Then slowly lower your pelvis back down to the floor.
NOTE: As you lower, think about using your glutes to lower yourself. When I first was doing this movement, I was kind of completely letting go of my glute muscles and using just my thighs/quads to lower my body. While you don't want to strongly grip your glute muscles as you lower, you do want to thin about those muscles being involved in the lowering of your body.
HOW TO SAFELY GET OUT OF THE EXERCISE
From the beginning position, release the band.

COMMON MISTAKES
COMMON MISTAKES
WHAT TO AVOID WITH THE GLUTE BRIDGE
KEY TIP:
Guess what? Good news! Many avoids are the same for most movements. Once you learn the basics, there's really only a few extra avoids for each individual movement.
1. Avoid Posterior Pelvic Tilt
AVOID: Avoid tilting your pelvis.
WHY NOT:
- Moving through the low back and pelvis can irritate the joints of the spine and sacrum.
- Moving through the low back and pelvis will not train the gluteus maximus to extend the hips while keeping the pelvis and low back in neutral.
WHAT TO DO:
- The low back and pelvis should not move during the bridge.
- The movement should be isolated to the hips - moving from being bent to being straight.
- This exercise is targeting the muscles of the hip during movement of the hip while stabilizing the spine.

2. Avoid Hamstring Pain
AVOID: Avoid using the hamstrings without the gluteus maximus.
WHY NOT?
- If your hamstrings cramp it means that your hamstrings are trying to take over the job of the glutes.
WHAT TO DO:
- Make sure that you are pushing down into your feet
- As you push down the crease at the front of the hip should flatten as the thigh bone is pushed forward by the gluteus maximus.
- Try putting your hands on the lower buttocks to feel the gluteus maximus working.
3. Avoid Feet Too Close To Bottom
AVOID: Avoid bringing the feet too close to your bottom.
WHY NOT?
- Bending the knees too far can strain the knee joint (between the kneecap and the thigh bone).
- This puts too much strain on the joint between the kneecap and the femur (patellofemoral joint) and may lead to degenerative changes over time.
WHAT TO DO:
- It is true that bringing the feet in closer to the bottom will work the gluteus maximus more and the hamstrings less, but avoid bending your knees too much) that it causes discomfort in the front of the knee.

4. Avoid Misalignment of Legs
AVOID: Avoid letting your knee or ankle roll in or out.
WHAT TO DO:
- Make sure you have good alignment of your upper leg, knee, lower leg, ankle and foot.
- You should not be rolling your knees or ankles inward or outward. Poor alignment will put a strain on the ligaments of the joints.
- It will also lessen the effect of the exercise by missing the opportunity to train the stabilizing muscles.
- Maintain good alignment: center of hip joint-a line down the thigh bone- center of kneecap-a line down the lower leg-center of ankle - foot flat on the floor.

5. Avoid dropping down & straining Neck
AVOID: Avoid dropping back down to the ground.
WHAT TO DO:
- Both the lift (concentric) and the lowering (eccentric) are important parts of the exercise.
- Dropping down instead of lowering down to the floor will only be working the muscles concentrically.
VARIATIONS
VARIATIONS
VARIATIONS OF GLUTE BRIDGEs
PULSING GLUTE BRIDGE
Pulsing at top
After pushing the pelvis up to the end of your range of motion, do several pulses at the top before then slowly lowering, then repeat for your whole set. This will help to fatigue the glutes by putting the muscle under tension for a longer period of time at the most challenging part of the move.
RATCHETING GLUTE BRIDGE
Ratcheting Slowly Down
Ratching involves a process on the way DOWN of the movement where you lower a little, then raise back up a little, then lower a little further, then raise back up a little, then lower a little further, back and forth, until you reach the floor again. That would be 1 rep.
FEET DISTANCE VARIATION
Vary Distance of Feet
GLUTE MAX FOCUS: Positioning the feet closer to your bottom (increased knee and hip flexion) will put more demand on the gluteus maximus.
HAMSTRING FOCUS: Positioning your feet further from your bottom will increase the demand on the hamstrings.
FEET FURTHER APART: This will work the abductors more, the muscles that help you move your legs apart. You want to be able to maintain good alignment of the leg - the thigh,knee, ankle & foot being aligned.

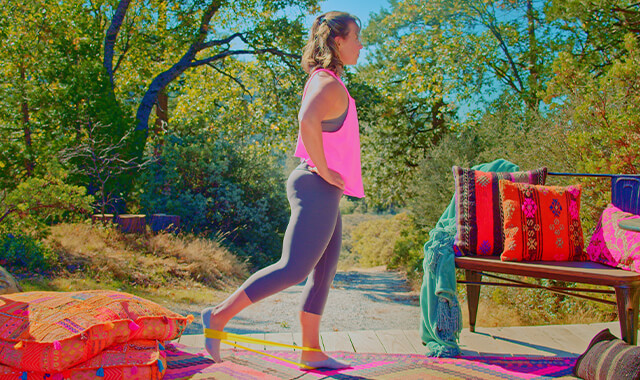
BANDED GLUTE BRIDGE
Glute Bridge with Mini Band
You can add an elastic band wrapped around the thighs to push out against – this increases the hip abductor and external rotator activity.
Turning the toes outward will further increase the external rotator activity.

NARROWER STANCE
Feet close together Glute Bridge
This will decrease the stability so the stabilizing muscles will work harder. Will increase the contribution from the inner thigh muscle that helps you bring your thighs together or resist the thighs bering pulled apart, called the adductor magnus.
You want to be able to maintain good alignment of thigh, knee, ankle and foot when doing this.
You can also add a small ball between thighs to push in against to increase the muscle activity of that inner thigh muscle.
Turning the toes inward will further increase the adductor activity, which are the muscles that function to bring your lower limbs closer to the center of your body.

FROG STANCE
Frog Glute Bridge
The Frog Glute Bridge variation will increase activation of the gluteus medius and minimus, the smaller glute muscles.
To do this version of the glute bridge, bring the bottoms of your feet together. You will likely find you cannot push your pelvis up as high in this position, that is normal.

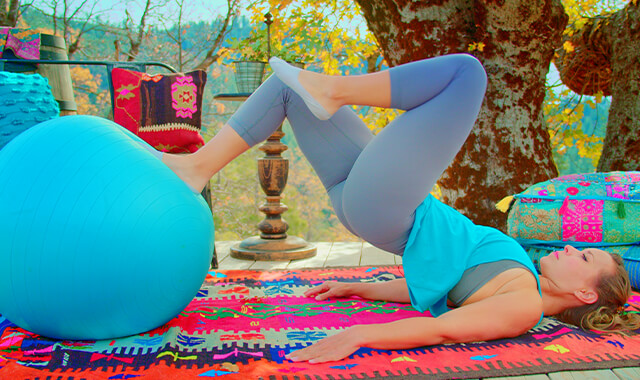
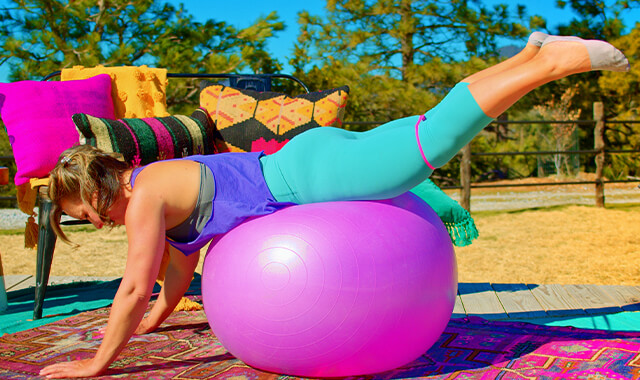
BALL Glute Bridge
Glute Bridge on Stability Ball
Putting your heels up on an exercise ball will increase the activity of the stabilizing muscles, which is an excellent way to train our whole bodies to be stable in the many everyday functions that we carry out as we move around.
IMPORTANT NOTE ON PROPER MUSCLE ACTIVATION & FORM FOR THIS VARIATION:
To do this without going into a “curl” up with a posterior tilt (where you are curling/tucking your bottom), really consciously think about the feet pushing down into ball along with really squeezing your glutes BEFORE you’ve even started to lift- I find that with my feet higher like this, it’s easier for my glutes to stay soft as I lift if I’m not consciously thinking about it, and then I end up lifting through my lumbar spine, instead of the hips.
Other cuing that may help is to lead with your belly button on the way up - like a string out of your belly button pulling you up, and to lead with your tail bone on the way down, so try to make that the first thing to touch the floor at the bottom.

GLUTE BRIDGE WITH HEEL/TOE LIFTS
Glute Bridge + Heel/Toe Lifts
BRIDGE WITH HEEL LIFT: Bridge up and hold at the top. Alternate heel lifts to work the muscles of the calf muscles (soleus and gastroc) and the foot and ankle.
BRIDGE WITH TOE LIFT: Bridge up and hold at top. Alternate toe lifts to work the muscles at the front of the shin (tibialis anterior), the muscles of the foot and ankle.


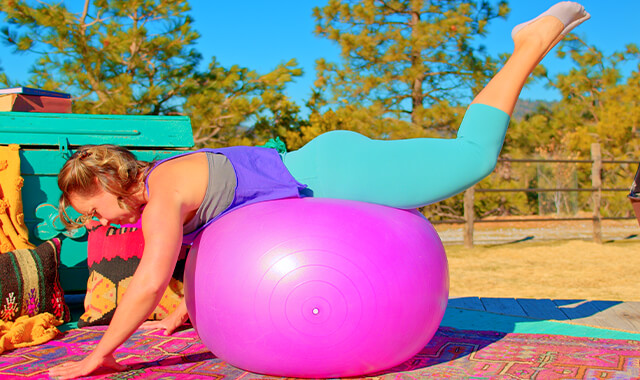
FEET ELEVATED
Reverse Hip Thrust Aka Reverse Glute Bridge
The reverse glute bridge will allow you to move through a greater range of motion – will increase the amount of hip flexion that you are extending from but will not increase the ability to get further into hip extension.
To do this variation, you will find something elevated to put your feet on- a foam pad or two to start, or as you get stronger you could do something taller like a coffee table or chair. Put the heels of your feet on this surface, and do the glute bridge like normal.
Remember not to let your spine bend or let your bottom tuck in this positioning.

DUMBBELL GLUTE BRIDGE
Weighted Glute Bridge
To do a dumbbell weighted glute bridge, hold a dumbbell along the crease area of the front of your hips.
I find one heavier dumbbell is much easier to work with than 2 dumbbells, but two can work if they are lighter and smaller.
Because the glute muscles are such big, strong, powerful muscles, it is very possible to increase to a pretty heavy dumbbell successfully - for instance, I can use a 30-35 lb dumbbell resting on my hips.

MAKE IT HARDER
HARDER
MAKING THE GLUTE BRIDGE MORE CHALLENGING
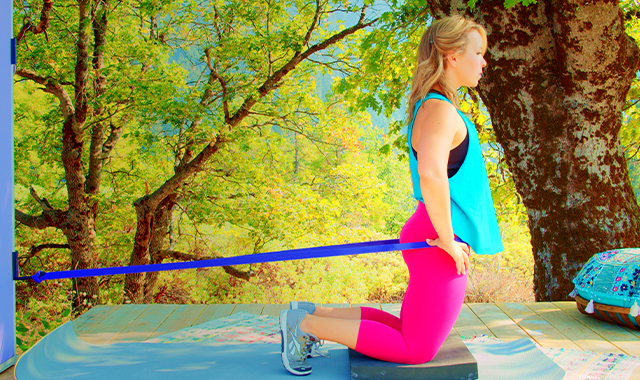
80/20 GLUTE BRIDGE
80/20 Glute Bridge Progression to Single Leg
Single leg glute bridges are....realllllly hard. Seriously. Whoever said you can't train glutes at home hasn't been doing single leg stuff with their bodyweight.
I find that most of us women will not be able to directly transition to a single leg bridge without some help - and it's very important not to strain our muscles.
One way to begin to work towards single-leg bridges is by staggering the feet.
Move one foot forward (nonworking leg) so that the heel of the front foot is in line with the toes of the working leg. Lift the toes of the nonworking leg so the weight is on the heel.
The goal is to have approximately 80% of the weight on the working leg and 20% of the weight on the nonworking leg. The pelvis must remain level throughout the exercise. While doing the movement, also consciously think about trying not to put too much pressure/weight on the non-working leg- the goal is to try to have the working leg doing as much as the work as possible.
After doing this for a while, you may be able to start doing a few reps of a set with just a single leg, and then finish the set with the 80/20 style, until you work up to being able to do a full set with just 1 leg by itself. An awesome accomplishment!

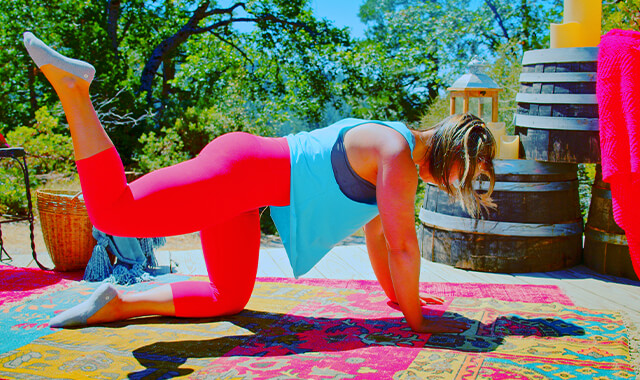
Intro to single leg
Single Leg Hip Raise
This will recruit the hip abductors (glute medius and minimus) to hold the pelvis level. Ensures activation of the left and right glutes independently – critical for walking, running, jumping and the health of the hip and spine.
Will recruit more core, hip, knee, ankle and foot muscles to stabilize and maintain alignment. Doubles the load on the working leg.
AND, it's just that much more work for the actual glute muscles since now only one leg is lifting the weight of your lower half instead of two - an excellent way to progress glute movements from home so that you are still building muscle.
LEG RESTS ON WORKING LEG
Leg Rests on Working Leg
Rest the ankle of the non-working leg on the knee of the working leg – this will increase the load on the working leg but will be more stable than holding the non-working leg up (unsupported).

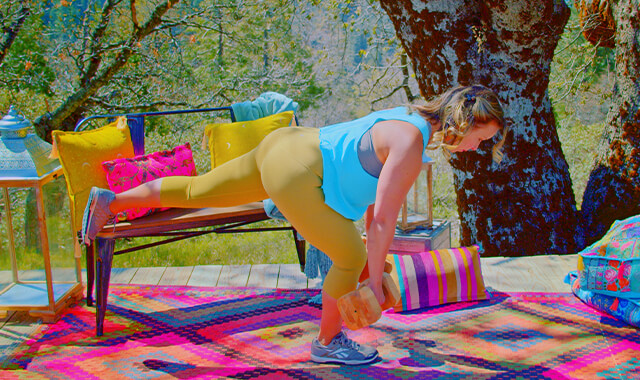
SINGLE LEG IN THE AIR
One Leg in the Air Glute Bridge
Bridge up and hold the bridge position. Hold one leg in the air, and do a set of 10 straight leg raises with the other leg.
This will increase activation of the stabilizing muscles and will fatigue the working quad and hip flexor muscles.

Increase core activation
Increase core activation
- To get the core muscles (abs and back muscles) more involved you can do this:
- Decrease the support – cross arms over chest, hold arms up in front of chest. Will increase core activation.
- Hold dumbbell in both hands over head (on ground). As you bridge up (single leg) bring the dumbbell forward with straight arms to just over the pelvis. Lower your pelvis and arms down and repeat.


MAKE IT EASIER
EASIER
MAKE THE GLUTE BRIDGE MORE DOABLE
TIGHT HIPS
Tight Hip Feeling At The Top Of Movement / Partial Range of Motion
If you feel tight at the front of the hip crease it could indicate that your hip flexors are limiting your ability to extend the hip. Because these days we sit a lot, hip flexors can tighten.
To work with this and gradually improve it, lift up to where the tightness begins and hold this position to stretch the hip flexors. Hold for about 30 seconds and then try the bridge again.
Another option is to bridge in a small range of motion (a few inches off of the floor) to establish the correct muscle activation and hip movement. Increase the range as able.

ISO HOLD
Isometric Hold Glute Bridge
Sometimes we struggle to have our glutes active in a movement, and may find we are feeling our quads and hamstrings working a lot more. To get the glutes more involved and work on the mind muscle connection with our glutes you can try this.
Work on isometric glute squeezes without any quad or hamstring activation and no movement in your pelvis or spine.
It helps to put a hand on your glute and use your other hand to monitor the other muscles. Make sure that you are able to get a good isolated glute max contraction on each side. Hold for a ten second count.
As you work towards doing the full movement, to help the mind- muscle connection thinking about: You should feel like your weight is all in your upper back/shoulders and feet, like your pelvis has been unweighted. This will help to initiate the movement. Push through the entire surface of the foot.

SCIENCY STUFF
ALLLL MUSCLES & WHEN
ALL MUSCLES WORKING & WHEN DURING THE GLUTE BRIDGE
The core muscles (transverse abdominis- deepest muscle of the abs, under the obliques), erector spinae (muscles in the back on either side of the spine) are engaged to hold the spine in neutral.
The gluteus maximus with help from the hamstrings act concentrically to extend the hips from a flexed position (crease at hips) towards neutral (no crease).
The gluteus maximus and adductor magnus become more active as the hip moves from flexion into extension (minus crease haha!).
The gluteus maximus is most active from neutral into extension.
The core muscles are active throughout the exercise. The same muscles of the hip work eccentrically to lower the body back towards the floor.
PIN IT FOR LATER!


