Hip Bend Planks
How to Do a Plank Variation with Alternating Hip Flexion - Bodyweight Core Exercise | In-Depth Guide [VISUAL LEARNERS] Advanced
Proper Form & Common Mistakes, Variations + Harder & Easier | Home Resistance Training

WHAT DO YOU WANT TO SEE?
QUICK DEMO
QUICK DEMO
MUSCLES THIS WORKS
MUSCLES
MAIN MUSCLES WORKED IN the Hip Bend Plank
LOTS OF CORE MUSCLES - SEE BELOW
Transverse abdominis, Erector spinae, Obliques, Rectus Abdominis, Multifidi, Quadratus lumborum
OTHER MUSCLES WORKED:
- Latissimus dorsi
- Gluteus maximus
- Iliopsoas
- Trapezius
- Rhomboids
- Pelvic floor
STARTING POINTERS
Starting Pointers
WHAT WE'RE DOING TODAY
Other names for this exercise: Plank with Alternating Hip Flexion
The Plank with Alternating Hip Bends (flexion) is an advanced version of the standard plank exercise used for stability training of the core. Adding alternating hip bending adds rotation to the exercise to work the muscles that stabilize the core one side at a time, making it a much more functional exercise than the standard plank. As one leg is lifted from the floor, that side of the pelvis and back will be pulled down by gravity. The muscles of the torso and pelvis will become more active to hold the position. This will work the gluteus medius and minimus and obliques more.
This plank variation will also work the iliopsoas muscle. This muscle originates on the lumbar vertebrae and attaches to the top of the femur. Its main job is to flex the hip (lift the thigh as in marching). When the legs are held still the muscles will arch the lower back, and when only one side is activated, the muscle can side bend or prevent side bending of the lumbar spine.
HOW TO DO THE EXERCISE
PROPER FORM
PROPER FORM: Plank with Alternating Hip flexion
EQUIPMENT, SETS & REPS
EQUIPMENT
None
SUGGESTED STARTING WEIGHT FOR WOMEN:
None
SETS & REPS:
10 - 16 reps (alternating).
PACE:
Slow control, focus on form not speed or number of reps.
BODY POSITION
BODY POSITION FOR THE Hip Bend Plank
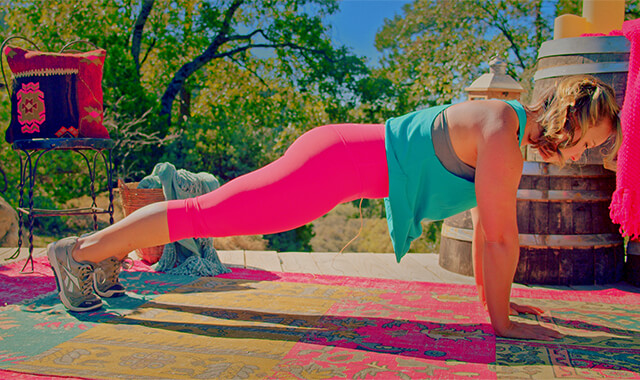
BODY STANCE: Plank position: Neutral spine (includes neck).Shoulder blades down and in, sternum. Elongate your spine and gently activate your core muscles along with your quads and your glutes to hold your body in a straight plank position. Your earlobe, shoulder, side of torso, hip, knees, and feet should be in a straight line.
ARMS: Straight, your elbows soft.
HANDS: Hands directly under shoulders, shoulder width apart. Palms on the floor, fingers facing forward
LEGS: Knees straight, legs energized. Toes anchored in the floor (ankle dorsiflexed).
HOW TO DO
HOW TO DO The Hip Bend Plank
CUE: The goal is to be as controlled and stable as possible, not bringing your leg in farther.
Keeping your spine in neutral, lift one leg up, bending your hip and knee to pull your knee in.
Your knee will move up, just above the floor under your hips.
Only pull your leg in as far as you are able to maintain a neutral and stable spine.
Straighten your leg back out to the starting position.
Repeat for the desired number of reps, alternating left and right legs.
HOW TO SAFELY GET OUT OF THE EXERCISE
Lower both knees to the floor, push back with your hands to kneeling. Step to standing.

COMMON MISTAKES
COMMON MISTAKES
WHAT TO AVOID WITH Hip Bend PlankS
KEY TIP:
Guess what? Good news! Many avoids are the same for most movements. Once you learn the basics, there's really only a few extra avoids for each individual movement.
1. Avoid Lifting Hips
AVOID: Avoid bending at the hips so that the hips are up in the air.
WHY NOT?
- This is a common cheat that will make the exercise much easier.
- This happens when you use your hip flexors to hold you up.
- This defeats the purpose of the exercise - using the hip flexors instead of the core muscles.
WHAT TO DO:
- Keep a straight line from earlobe to feet - it is helpful to use a mirror or take a video to look at your form.

2. Avoid Midsection Sag
AVOID: Avoid letting your midsection sag down.
WHY NOT?
- If your stomach drops down towards the floor you are not using your abdominal muscles to help hold the position.
- This extends the low back and increases the pressure on the spine.
- This will decrease the activation of the core muscles and upper body.
WHAT TO DO:
- Lift your belly up towards your spine - without lifting the hips (belly button and spine get closer together).
- Keep a straight line from earlobe to feet - it is helpful to use a mirror or take a video to look at your form.

3. Avoid Dropping Into Shoulder
AVOID: Avoid dropping into the shoulder.
WHY NOT?
- Stresses the shoulder joints, and increases the lumbar curve.
WHAT TO DO:
- Keep the shoulders back and sternum lifted.
- Press down into the floor with the support hand.
- Lengthen the spine (including the neck) and energize the arm that is reaching out.
- This will activate the muscles of the core.

4. Avoid Rounding Spine
AVOID: Avoid rounding the back.
WHY NOT:
- Too much flexion in the spine can lead to irritation or compression of the spinal joints and discs.
WHAT TO DO:
- LIft the sternum, push your upper body up and lower your pelvis (hip in line with shoulder and knee).
- Lengthen the spine.

5. Avoid Tucking Or Lifting Chin
AVOID: Avoid tucking your chin or lifting your chin.
WHY NOT?
- Your neck should be in a neutral position and feel lengthened to avoid compressing the joints or straining the muscles
- The cervical muscles will be strengthened in a plank because you are holding the weight of your head in line against gravity - you want to make sure that you are strengthening the muscles in the healthiest position.
WHAT TO DO:
- Try looking at the floor to help keep the neck in neutral.

MAKE IT HARDER
HARDER
MAKING THE Hip Bend Plank MORE CHALLENGING
All Reps On One Side
One Side At A Time
Complete all of the reps on one side, without touching the working leg down to the floor. This will work the muscles of the torso harder, a longer time under tension, working on increasing muscle endurance.
MAKE IT EASIER
EASIER
MAKE THE Hip Bend Plank MORE DOABLE
With Slider
Hip Bend Plank With Slider
Put a slider, sock, and towel under one foot. Bend the knee and pull the foot in. This will decrease the core and leg muscle activation because the torso will not have to work as hard to hold the torso level against the downward pull of gravity (two legs still in contact with the floor). The muscles of the lower back and pelvis will have to stabilize against side bending as one leg is being pulled up. The support leg will not have to work as hard to stabilize the lower body (two legs on the floor at all times). For this variation, all the reps will be done on one side and then you will move the slider over to the other side (not alternating).

WHAT WE'RE DOING TODAY
WHAT & WHY
BENEFITS OF TRAINING THE core
WHAT
THROW TIME OUT THE WINDOW PLS
Learning how to hold the plank position correctly opens the door to a lot of fun and very effective exercises.
Planks are probably one of the most commonly known and used core exercises. One important thing for us to know before we get into these is not only is this NOT a competition, but we also do not have the goal of holding the plank as long as possible.
Possible is an interesting word. Is it possible to hold a plank for x amount of time if you compromise your form? Yes. Is that a good idea? No. So in a way, it isn’t possible. :)- to me, “possible” should always be within the framework of what can be done healthfully. Pushing your body to very uncomfortable limits I find, at least at my current age, to usually cause injury or pain. It is not the road to better fitness. Better fitness is gradually, sequentially, adding load or time or difficulty. Very progressively. So same with the planks, don’t hold these until you are shaking so hard it seems like you’re having convulsions. It’s more about holding long enough to feel like your muscles have done some work- that they felt a reasonable amount of challenge, then taking a breather before doing it again or doing another exercise before coming back to it. This is how to make planks work for you rather than against you.
Not so long ago the word began to spread that sit-ups were not the best way to work the core muscles and people started doing planks. You will frequently see people in the gym holding the plank position with their whole body shaking, watching the seconds tick by on the clock. Unfortunately, many of those people have their hips lifted up into the air, their backs arched with their stomachs sagging down, their upper back rounded up or sagging down, or they have their heads raised watching the clock. For maximum benefit, it is important to learn how to do planks with the correct form.
The plank involves holding your torso parallel with the floor, because of the great distance between your shoulders and toes (the two points of support), your midsection is pulled towards the floor, causing your low back to arch. The abdominal muscles, especially the rectus abdominis - or 6-pack muscle will need to work a lot to prevent this from happening. This makes this exercise a safer alternative for targeting this muscle group, as opposed to sits and crunches which involve repetitive movement in the lower spine.
The forearm plank and standard plank (arms straight) are good exercises for learning to use the core muscles to hold the spine in a neutral position. They are pretty basic - you get into a horizontal (nearly parallel to the floor) neutral spine position and hold the position. This will teach the muscles to support and stabilize the spine in its healthiest position against the downward pull of gravity. The muscles that support the spine run from the base of the head all the way down to the pelvis. Once this position is mastered you can add movement of your arms and legs to make the exercise more functional. Think about the way we use our body in everyday life, we usually need to keep the spine stable as we move our arms and legs.
We are going to go through the instructions for the Forearm Plank and Plank positions which are valuable exercises to build the foundation for more advanced movements that involve holding the position while moving the arms and legs. Forearm Planks are an option if you have limitations or discomfort of the shoulders, elbows, and wrists, or upper body weakness.
Planks are great because the exercise can be done most anywhere, you don’t need any special equipment because your body weight is the resistance. The movement can easily be adjusted to make the exercise doable but challenging.
WHY BOTHER DOING IT?
WHY
WHY DO WE EVEN CARE?
PLANKS TEACH US WHAT IT MEANS TO HOLD OUR TORSO STILL
The basic idea is that most of us, including myself, move too much through our spine & not enough through our other joints like hips, knees & ankles when doing things in life, especially things that involve lifting or moving a load of some sort that feels heavy. The way our bodies are designed is to behave in the opposite way- for our spine to stay relatively still & to move a lot through our hips & knees & ankles.
Planks are one of the first steps in reversing the way we’ve been moving our bodies. In a plank, the goal is to hold our spine & torso as still as possible, in a position where it’s hard - where gravity is pulling on us making it feel much easier to let our spine arch or round.
Since planks do not involve moving any body parts, that lets us focus on waking up these muscles of the core- helping us to learn to feel what muscles should be turned on, what it feels like to hold the spine still in a neutral spine when it’s challenging to do so, & gradually increase the endurance of these muscles to stay in such a position. When something is new to us, it’s important to not have too many things to focus on at once, like moving a bunch of body parts.
A DIFFERENT KIND OF STRENGTH & FOCUS
This is an important first step for the vast majority of us ladies. When I first began doing any neutral spine core exercises, I had VERY little strength or ability. Despite the fact that I’d been “working out” - with heavy weights even, for over a decade. I really had to start SUPER basic in order to do core exercises with proper form. But it’s worth it because you’ll be building a new foundation for body movement- one that has longevity to it!
You will be amazed at how quickly your ability improves with these types of core exercises.
CHOOSE CORE EXERCISES BASED ON HOW WE USE CORE MUSCLES IN LIFE
The internet is full of creative ways to exercise the core. In order to figure out which exercises you should be doing, it is helpful to think about how the core works. One of the most important jobs of the spine is to hold the body up as the arms and legs move. When you lift objects, like kids or groceries, you can only safely lift as much as the spine can support. Think about what happens when you try to lift a really heavy object - you cannot straighten up your spine, and you could strain your back.
The spine is made up of 24 vertebrae, and each pair of vertebrae is connected by three small joints. These joints only have a tiny amount of movement. The spine is also supported by the discs, ligaments, tendons, and layers of muscles attached to the vertebrae. The spine is designed to be stable. On the flip side, the hip and shoulder joints are designed for movement. The end of the upper arm bone and the thigh bone are shaped like balls making up one side of the joint, the other side of the joint is a surface shaped like a small disc or shallow bowl. The best exercises to do are exercises that work the body the way that it is designed to work. A very functional way to strengthen the core muscles is to hold the spine in its healthiest position while moving the arms and legs.
It is true that the spine moves, and moving the spine is good for it. When you move your spine, a little bit of motion comes from a lot of different joints. For example, when you bend forward, the total distance the spine can bend forward is pretty far. But the flexibility of the spine is made up of a little bit of movement at many different vertebrae, and also movement at the pelvis and hips. Unfortunately what commonly happens is that the hips and upper back do not move very much and the low back makes up for the lack of motion by moving more than it should. This is the most common cause of low back pain, too much movement in a small section of the low back. Moving this small section over and over again or when lifting or moving weight, will increase the pressure on just a few discs, and stretch out the support structures at that part of the spine. When the support structures are stretched or the discs are damaged, that section of the spine will move even more. This is known as spinal instability - that part of the spine is no longer stable. Too much movement in the spine can lead to injury or damage to the joints of the spine, bones, or the nerves that exit between the vertebrae. You may know someone that has had surgery for spinal fusion. This is when the surgeon inserts hardware into the spine to try to make it more stable.
The main function of the muscles of the torso is to protect the spine from damage by holding the spine in a healthy position and preventing excessive movement. These muscles work any time we are in an upright position, even standing, and sitting.
When you do planks, a lot of the body’s weight is on the arms with either the forearm or hands in contact with the ground. Bearing weight through joints activates the proprioceptors, which are sensory receptors that send messages to the brain about where the arms or legs are. Proprioception (the body’s knowledge of where it is in space) is needed for motor control, balance, and stability. Weight-bearing through bones also stimulates bone growth which is why weight-bearing exercises are great for preventing and treating osteopenia and osteoporosis.
EVERYDAY LIFE
EVERYDAY LIFE &
MUSCLE FUNCTION
HOW WE USE OUR core IN EVERYDAY LIFE
ALL OF THE MUSCLES OF THE CORE WORK TOGETHER TO STABILIZE THE SPINE.
1. HOLDING THE BODY UP:
- Standing
- Walking
- Running
- Squatting
- Sitting
2. HOLDING THE SPINE IN GOOD ALIGNMENT DURING:
- Removing clothes from washer/dryer/dishwasher
- Lifting -boxes, kids from the floor, and groceries out of a car
- Pushing a stroller, wheelbarrow
- Carrying - kids, groceries
- Bending forward
- Picking things up from the floor
- Gardening
- Shoveling, raking, sweeping, vacuuming
- Leaning backward - replacing an overhead light bulb, lifting dishes up or down from a high shelf
SCIENCY STUFF
ALLLL MUSCLES & WHEN
ALL MUSCLES WORKING & WHEN DURING THE Plank with Alternating Hip Flexion
The core muscles (extensor spinae, deep spinal extensors (semispinalis, multifidi, rotatores, interspinales and intertransversarii, quadratus lumborum, obliques, rectus abdominis, and transverse abdominis) work to stabilize the body in the plank position. The hip muscles work to hold the pelvis level: iliopsoas, adductors magnus, brevis, and longus, gracilis, gluteus maximus,medius, and minimus, hamstrings, and the quadriceps femoris.
The scapular, back, and arm muscles (rhomboids, mid and lower traps, serratus anterior, pec minor, latissimus dorsi, teres major, deltoids, biceps, triceps, muscles of the forearm, and rotator cuff), work together to stabilize the upper body as the legs move.
The working leg: hip flexors - iliopsoas and rectus femoris work concentrically to bend the hip, bringing the knee in under the hip.
The muscle activity of the core muscles will increase to hold the spine in neutral as one knee and hip flex. There is a tendency to let the pelvis rotate posteriorly as the leg flexes, which would cause the back to flatten. The erector spinae works to hold the lumbar curve as the leg is bent.
The quadriceps femoris (knee extension), gluteus maximus, and hamstrings (hip extension) work concentrically to straighten the leg.
PIN IT FOR LATER!


