Mini-Band Standing Glute Kickbacks
How to Do the Beginner Standing Donkey Kicks w/ Mini Band - Glute Isolation Exercise | In-Depth Guide [VISUAL LEARNERS] Beginner
Proper Form & Common Mistakes | Home Resistance Training
Related Posts
WHAT DO YOU WANT TO SEE?
QUICK DEMO
QUICK DEMO
MUSCLES THIS WORKS
MUSCLES
MAIN MUSCLES WORKED IN Mini-Band Standing Glute Kickbacks
GLUTEUS MAXIMUS
OTHER MUSCLES WORKED:
- Hamstrings
- Adductor Magnus
- Gluteus Medius and Minimus
STARTING POINTERS
Starting Pointers
WHAT WE'RE DOING TODAY
Other names for this exercise: Standing Donkey Kick w/ Mini Band
This version of the standing donkey kick is done with a mini band around the knee of the non-working leg and the foot of the working leg. This is a good option for trying to isolate and strengthen the gluteus maximus muscle. This is a convenient option if you don’t have anywhere to anchor a band. You will feel the muscles of the “non-working” hip working to balance and stabilize the leg.
HOW TO DO THE EXERCISE
LOOKS
HOW Mini-Band Standing Glute Kickbacks SHAPE OUR BODY
Shapes and lifts buttocks.
PROPER FORM
PROPER FORM: Mini-Band Standing Glute Kickbacks
EQUIPMENT, SETS & REPS
EQUIPMENT
Mini Band
The standard mini-bands are about a 12" loop- which is actually too big for a lot of exercises to be effective (I mean, they'll do, but if you can....)
These are better & you'll be less annoyed:
10" loop mini-bands
9" loop mini-bands
9" loop mini-bands
If you buy 1 set, get the 9" size. I honestly recommend getting both. They're affordable & give you a lot of versatility to find the right stretch & resistance for a variety of exercises.
If these aren't currently for sale, you will need to search specifically for 9-inch or 10-inch mini bands. If you just search mini bands all you'll ever see are the 12" ones.
SUGGESTED STARTING WEIGHT FOR WOMEN:
Moderate resistance bands
SETS & REPS:
2 sets of 8 reps
PACE:
Moderate with a good squeeze at the end.
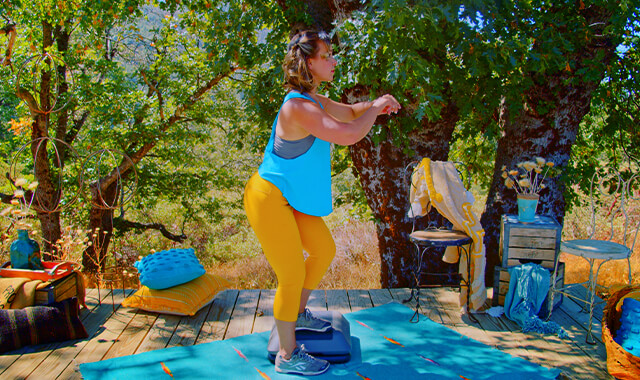
BODY POSITION
BODY POSITION FOR THE Mini-Band Standing Glute Kickback
BAND: Loop the miniband around the knee of your non-working leg and the foot (around the arch) of your working leg. The band can be wrapped around your working foot to get it taut or to prevent it from slipping.
BODY STANCE: Stand with a neutral spine (including neck). Your pelvis and shoulders should be level and square. Lift sternum.
LEGS: Standing Leg - knee with a small bend, the hip will have a slight bend. Toes forward. Working Leg: hip in neutral, no hip crease. Knee bent to a right angle (90 degrees). The band should be taut in the starting position. Thighs close together but preferably not touching (depends on your shape - they may touch, but try to avoid using your working leg to stabilize your standing leg). Your knee pointing straight down.
ARMS: Hands on hips.
HOW TO DO
HOW TO DO Mini-Band Standing Glute Kickbacks
CUE: Check your posture during the set - the temptation is to lean forward. Make sure that you are standing tall, lifted up at the sternum.
Think of pushing the bottom of your foot back.
The movement will be small, only a few inches.
You should feel a good squeeze in your gluteus maximus, and hold for 1-2 seconds.
Return your leg to the starting position and repeat.
HOW TO SAFELY GET OUT OF THE EXERCISE
Straighten your knee, remove the band and set your foot on the floor.


COMMON MISTAKES
COMMON MISTAKES
WHAT TO AVOID WITH THE Mini-Band Standing Glute Kickback
KEY TIP:
Guess what? Good news! Many avoids are the same for most movements. Once you learn the basics, there's really only a few extra avoids for each individual movement.
1. Avoid Lifting Leg Too High
AVOID: Avoid lifting the leg too high.
WHY NOT?
- This is the most common error.
- This movement is coming from the back instead of the hip, basically, the back is just collapsing and gravity is pulling it into an arch.
- This can irritate the small joints of the spine.
WHAT TO DO:
- Put your hand on the top of your pelvis to monitor for movement - it should not be moving
- Remember that you only have about 15 degrees of hip extension - that is (very) roughly the position the leg would be in if you put the toes of the back foot at the heel of the front foot.

2. Avoid Weight Shifting to Nonworking Side
AVOID: Avoid leaning your body towards the “non-working” side.
WHY NOT?
- This will change the muscle activity of the working leg.
- When the torso leans away from the side of the “non-working” leg one of two things can happen:
- The hip is now lifting to the side - working the muscles that lift the leg out to the side.
- If the leg is still lifting straight back, it is no longer lifting directly against gravity - it is lifting at an angle so the load on the muscles will be less.
- Decreases the work of the back extensors.
WHAT TO DO:
- The arm on the side of the working leg will need to support more weight when the leg is lifted from the floor.

3. Avoid Bending Spine Arching Sagging
AVOID: Avoid moving the back or pelvis as you lift and lower the leg.
WHY NOT?
- This is a common error - mistaking back movement for leg movement.
- This can lead to irritation of the small joints of the pelvis and spine.
- This will decrease the muscle activity of the hip extensors.
WHAT TO DO:
- The goal of the exercise is to isolate the movement to the hip joint -moving the thigh bone forward and backward in the hip socket.

4. Avoid Bending Knee Too Much
AVOID: Avoid letting the working knee bend more than 90 degrees.
WHY NOT:
- Bending the knee more than 90 degrees (a right angle) will lessen the load on the muscles.
WHAT TO DO:
- The further the foot is away from the hip the harder the muscles will need to work.
- Think of pushing the sole of the foot straight up to the ceiling.

5. Avoid Shifting Weight Forward To Torso Arms
AVOID: Avoid shifting your weight forward to your upper body when the leg lifts up.
WHY NOT?
- This will give you the illusion of lifting the leg up higher, but you really are dropping the upper body down instead of lifting the leg.
- Frequently this happens when you bend your elbows every time you lift your leg, leaning your weight onto your arms.

6. Avoid Knee Moving Outward
AVOID: Avoid letting the knee drift out to the side.
WHY NOT?
- This will change the angel of the muscle fibers and may work on one side of the muscles more than the other.
- This frequently happens when the iliotibial (IT band) - a large band of connective tissue that runs down the outside of the thigh, is tight.
WHAT TO DO:
- Keep the knee pointed straight down to work the hip extensors and not the hip abductors muscles.

WHAT WE'RE DOING TODAY
WHAT & WHY
BENEFITS OF TRAINING THE GLUTEUS MAXIMUS
WHAT
Glute Kickbacks are done in standing and target the gluteus maximus muscles. Exercises that target the gluteus maximus are frequently done lying down on your back, like bridges and hip thrusts, or on hands and knees, for example, donkey kicks. The reason for this is that in these positions - with the torso closer to parallel to the floor, you will be lifting the leg or the torso up against the downward pull of gravity.
Working the gluteus maximus muscle while standing up requires the use of a band to add resistance. There are two main benefits of working the gluteus maximus in standing: 1) we use our gluteus maximus in an upright position during most of our activities. Working the muscle in this position is good for developing an appreciation for how the muscle works. It is not uncommon to rely more on the hamstrings and less on the gluteus maximus, the reason for this is not clearly understood, but some believe that it is due to lifestyle changes - sitting more; 2) working the gluteus maximus in standing involves standing on one leg at a time. This will work the standing (non-working) leg - targeting the gluteus medius and minimus, and also balance and stability.
Standing Glute Kickbacks involve standing with good posture and lifting the working leg back behind the torso, into hip extension. The legs start out parallel and the working leg is pulled back, behind the body. This is “hip extension”, the gluteus maximus is the primary muscle responsible for this movement. This hip does not have a lot of movement in this direction, only about 15 degrees. To get a feel for how much this is, place the toes of one foot about 1- 2 inches past the heel of the other foot, with both feet flat on the floor. The pelvis should be square to the front, using a mirror can help you find the right position. It is important to be able to find this position in order to get the exercise right. A common error is to move the pelvis back with the leg, this will not be hip extension, but back extension.
WHY BOTHER DOING IT?
WHY
WHY DO WE EVEN CARE?
Good posture means that the spine is in a neutral position (not bent forward, backward, the side, or rotated). It is a position where there is the least amount of stress on the joints, ligaments, and muscles, keeping you balanced over your feet. It is also the healthiest position for your entire body. Having good posture can help to maintain balance, and prevent fatigue, joint and muscle strains, neck, mid-back and low back, and even shoulder and arm pain. Good posture makes it easier to move, makes you feel more confident, and probably more attractive.
Unfortunately, poor posture is fairly common. Sometimes it is caused by the way you sit, lack of exercise, the way you move throughout the day, and of course, poor posture is a common age-related change. One of the most noticeable changes that occurs with aging is a rounding of the upper to mid back, this is called kyphosis. It can be caused by osteoporosis, but also by just normal wear and tear on the joints because of poor habits. A curved upper back moves the head in front of the base of support (center of gravity). A forward leaning, or slouched posture will shorten the muscles on the front of the hips (hip flexors - iliopsoas and rectus femoris) and torso, and lengthen the muscles on the back of the torso and hips. To adjust for these changes, during walking, the legs do not move back as far (limited hip extension). If the leg is not moving back behind the body, the hip joint gets tight. This can lead to shorter steps and slower walking speeds. The gluteus maximus is an important muscle for holding us in good upright posture, if the muscle weakens then our posture gets worse - this can lead to a progressive downward spiral. The good news is that this can be prevented or slowed by doing the right exercises with good form.
There are other exercises that are done in standing that will work the gluteus maximus - like lunges, squats, and deadlifts. But those exercises focus on pulling the hip back from a flexed position to neutral. Standing Kickbacks are one of the few exercises that work the leg from neutral and back into extension. This is a really good way to learn how the hip moves back behind the body, this will help to keep the hip joint mobile and the gluteus maximus strong.
It should be noted that the hip should move back behind the body when you are walking, but when you are walking on level ground, this movement does not require much muscle activity. When you are walking uphill or running the gluteus maximus is more active. The goals of the standing kickbacks are to move the hip into extension and to try to isolate the gluteus maximus muscle for strengthening while holding the spine in neutral.
EVERYDAY LIFE
EVERYDAY LIFE &
MUSCLE FUNCTION
HOW WE USE OUR GLUTEUS MAXIMUS IN EVERYDAY LIFE
1. THE GLUTEUS MAXIMUS MOVES THE THIGH BACK FROM A BENT POSITION TO STRAIGHTEN THE HIP (HIP EXTENSION)
- Transitioning from sitting to stand
- Standing upright with good posture
- Running and walking uphill
- Jumping
- Standing back up from squatting down
- Lifting items from the floor
2. HELP TO TRANSFER POWER FROM THE LEGS TO THE ARMS
- Batting
- Golfing
- Tennis
- Shoveling
- Vacuuming
- Throwing a ball
3. STRAIGHTENING (EXTENSION) THE HIP
- Walking
- Running
- Moving from sitting to standing
- From a chair
- Out of a car
- Off of the toilet
- Going up and down stairs
- Getting up from squatting
- Lifting from the floor
- Getting up from the floor
- Standing up from a bent-over position
- Unloading a dishwasher/dryer
4. HOLDS THE BODY UPRIGHT
- Standing
5. RESTRAINING/BREAKING THE PULL OF GRAVITY ON THE UPPER BODY
- Leaning over - prevents the torso from being pulled down
HOW TO FEEL WHAT MUSCLE IS WORKING
How to Feel What Muscle is Working
Stand facing away from a wall. Bend your knee and place the bottom of one foot on the wall. Place your hands on your buttocks - one on each side. With the leg that is on the wall - push back into the wall. You should feel that side of the buttocks tighten up, while the other stays relaxed. If you are unable to contract the one side while keeping the other relaxed, work on this before progressing to the glute kickbacks.
SCIENCY STUFF
ALLLL MUSCLES & WHEN
ALL MUSCLES WORKING & WHEN DURING THE Mini Band Standing Glute Kickback
The core muscles are working to stabilize the spine in neutral alignment. The standing leg: the gluteus medius and minimis work to hold the pelvis level; the leg muscles work to keep the hip/knee/lower leg/ankle and foot aligned and stable.
The gluteus maximus, adductor magnus, and hamstrings (with the exception of the short head of the biceps femoris) contract concentrically to pull the thigh back and isometrically to hold the thigh in extension. The same muscles act eccentrically to control the return to the starting position.
PIN IT FOR LATER!


